Project Management
Currently, this section is specific to OpenFn/platform v1.
Jobs
This section of the portal allows you to create and manage your jobs.
Searching jobs
For a project with a number of jobs, finding a job can be easily achieved via the search feature.
To search for a given job:
- From the application menu, click on Jobs.
- Find the Search jobs box and type the name of the job in the search box.
- The application will filter and show all jobs matching the portion of text entered into the search box.
Switching on/off a job
In OpenFn, a job is off by default. To switch on a given job, follow the steps below:
- From the application menu, click on Jobs.
- Find the job you would like to turn on.
- On the top-right corner of the job card, click on the switch button to turn on/off the job.
- Once switched on, the job's switch button will change the color to blue.
Note that once a job is switched on, OpenFn will run it automatically, as configured. If you do not want a job to be run automatically, by OpenFn, then turn it off.
Making a job private
OpenFn allows you to share jobs to an open source job library that other users can learn from or reuse. All jobs are available for sharing and inherit project sharing settings, by default. If you do not want a given job to be available for sharing to OpenFn's Job Library, then you can mark that job as private. To mark a job as private, follow the below steps:
- From the application menu, click on Jobs.
- Find the job you would like to mark as private.
- On the bottom-left corner of the job card, click on the View.
- While on the details page for the selected job, click on the eye icon.
Note that once a job is marked as private, sharing will be blocked even if its project is enrolled in the OpenFn's Job Library. You can toggle this setting back by clicking on the eye icon.
Archiving a job
OpenFn allows you to archive a job if it is no longer needed or used. To archive a job, follow the steps below:
- From the application menu, click on Jobs.
- Find the job you would like to archive.
- On the bottom-left corner of the job card, click on the View.
- While on the details page for the selected job, click on the archive icon.
- Confirm archiving in the dialog that pops up after clicking the archive icon.
Note that once archived, the job won't appear in your jobs list. Also messages will not appear to match against it until you restore the job. Also note that a job cannot be deleted, it can only be archived.
Restore archived job
To restore an archived job, follow the steps below:
- From the application menu, click on Jobs.
- While on the jobs list page, click on the Show archived jobs button.
- All archived jobs will be shown in the jobs list.
- Find the job you would like to restore.
- On the bottom-left corner of the job card, click on the View.
- While on the details page for the selected job, click on the restore icon.
- The job will now be shown in the list of available jobs.
Disabling console logs for a job
OpenFn allows you to disable console.log statements for your job. Disabling
console.log ensures that sloppy or malicious code written in the job
expression does not expose sensitive data from the jobs.
To disable console.log for a given job, follow the steps below:
- From the application menu, click on Jobs.
- Find the job you would like to disable console log for.
- On the bottom-left corner of the job card, click on the View.
- While on the details page for the selected job, click on the lock icon.
Editing a job
OpenFn allows you to edit or make changes to existing jobs. To edit a given job, follow the steps below:
- From the application menu, click on Jobs.
- Find the job you would like to edit.
- On the bottom-left corner of the job card, click on the View.
- While on the details page for the selected job, click on the pencil icon.
- See details about job editing in Job Studio here.
Job change history and reverting changes
If your job is linked to a GitHub repo, changes made to a job expression can be reverted to a given git commit. To revert changes made to a job expression, follow the steps below:
- From the application menu, click on Jobs.
- Find the job whose changes you would like to revert.
- On the bottom-left corner of the job card, click on the View.
- While on the details page for the selected job, scroll down to the bottom of the job card and click on View Change History.
- Select a corresponding change history row.
- Accept the prompts to revert to a previous commit, in the revert dialog.
Note that after the revert dialog confirmation, the job expression will instantly be reverted to a selected commit. No other jobs will be reverted. To instantly revert all jobs in for a given project to a previous commit, resend the webhook from GitHub.
Creating a new job
To create a new job, follow the steps below:
- From the application menu, click on Jobs.
- Find a blue floating button with + icon, and click on it.
- Clicking the + button will open Job Studio for you to enter details for your new job.
- See details on how to use Job Studio here.
Job Studio
Job Studio is OpenFn's Job Editor. It allows you to create a new job or edit an exisiting one. It can be accessed by following the steps for editing an existing job or creating a new job. The instructions below assume you already know how to open Job Studio by either methods.
Changing Job Studio mode
Job Studio comes in two editing modes, namely Wizard mode and Fullscreen mode. By default, OpenFn JobStudio runs in wizard mode. Wizard mode allows you to configure a job via a step-by-step configuration wizard. On the other hand, Fullscreen mode allows you to quickly configure or edit the job without the help of the wizard.
To change from one Job Studio mode to another, follow the steps below:
- While in Job Studio, in the top-right corner, click on the fullscreen icon.
- Depending on the current Job Studio mode, clicking on the fullscreen icon will toggle the editing mode to either Wizard or Fullscreen.
Note that once you toggle the editing mode, OpenFn updates your user settings and saves this editing preference as your default Job Studio mode for subsequent editing sessions. Note, however, that when creating new jobs, Job Studio will always open in Wizard mode, regardless of your saved editing mode preference.
Configuring a job
While in Job Studio, if in Wizard mode, you will see four configuration steps and an expression editor. In Fullscreen mode, the four configuration steps appear as regular fields, without a wizard.
The four configuration steps include giving the job a name, defining what triggers its execution, selecting an adaptor, and providing authentication details.
The expression editor is the area where you write your job expression. Fill-in all the details, and click on the Save icon in the top-right corner to save your job's configuration changes.
Inspecting job's initial state
This feature allows you to view the initial state of a selected job. Note that this feature is currently only available for message-triggered jobs.
To view or inspect a job's initial state, click the expression pane splitter and
drag to the right. After dragging, you will see a json tree representation of
the matching initial state. To copy a path to a given node in the state, click
on the Copy to clipboard icon overlaid on the node. The path to that node
will be saved to clipboard, and can then be pasted inside the expression editor
as data path for the job's expression.
Accessing inline adaptor documentation
For a selected adaptor, OpenFn allows you to view documentation and code examples for each adaptor operation.
To view adaptor documentation, click on the documentation icon(first icon) on
the top-right corner of the Expression Pane.
Each adaptor operation has a short description and an example. You can click on the example expression to copy and use it in your job's expression editor.
Also note that expression examples or code snippets for adaptor operations can
be auto-generated through the expression editor's autocompletion feature. To
generate a code snippet for a given operation, type the first few letters of the
operation and press the tab key.
Changing JobStudio theme
OpenFn allows you to customize the feel and look of Job Studio. To change Job
Studio's theme from the default one, click the color palette icon, and select
a theme of your choice.
Installing a unreleased adaptor version
In Job Studio, you can install adaptors that are not part of the recommended adaptors picklist directly from npm.
Testing a job
You can test your job without exiting Job Studio, by clicking on the Save and Run button. You can find the Save and Run button in the bottom pane of the Job Studio.
After clicking on Save and Run, the job will be run and its logs will be
streamed to the Run logs console.
Note that this feature is currently only available to message-triggered jobs.
Triggers
This section of the portal allows you to create and manage your Triggers.
Searching triggers
For a project with a number of jobs and a range of trigger criteria, finding a given trigger can be easily achieved via the search feature.
Triggers can be filtered/searched by name or criteria. To search for a given trigger:
- From the application menu, click on Triggers.
- Find the Search triggers box and type, in the search box, the trigger
criteria for a message trigger (e.g,
{"test": "data"}) or name of the trigger for any other type of trigger. - The application will filter and show all triggers matching the portion of text entered into the search box.
Editing a trigger
OpenFn allows you to edit or make changes to existing triggers. To edit a given trigger, follow the steps below:
- From the application menu, click on Triggers.
- Find the trigger you would like to edit.
- On the bottom-left corner of the trigger card, click on Edit.
- See details about types of triggers and other editing options here.
Deleting a trigger
OpenFn allows you to delete an existing trigger. To delete a given trigger, follow the steps below:
- From the application menu, click on Triggers.
- Find the trigger you would like to delete.
- On the bottom-left corner of the trigger card, click on Edit.
- While on the edit page for the selected trigger, click the trash icon.
- The application will prompt you to confirm whether you would want to proceed with deleting the given trigger.
Note that OpenFn will mark this trigger for deletion. You will not be able to access or edit the trigger once this is done. If there are any jobs linked to this trigger, they will not run successfully until you assign them new or other existing triggers.
Creating a trigger
To create a new trigger, follow the steps below:
- From the application menu, click on Triggers.
- Find a blue floating button with + icon, and click on it.
- Clicking the + button will open New Trigger Form for you to enter the details for your new trigger.
- See details about types of triggers and other editing options here.
Credentials
This section of the portal allows you to create and manage your Credentials.
Searching Credentials
For a project with a number of jobs and a range of credentials, finding a given credential can be easily achieved via the search feature.
Credentials can be filtered/searched by name. To search for a given credential:
- From the application menu, click on Credentials or My Credentials.
- Find the Search credentials box and type, in the search box, name of the credential.
- The application will filter and show all credentials matching the portion of text entered into the search box.
Note that if you are searching for all credentials you own, then find them via the My Credentials menu item otherwise you can find all credentials assigned to a given project via the Credentials menu item. Also note that not every credential you own is available to all the projects you are member of. See details about credential ownership and access here.
Credential ownership and access
A credential is owned, by default, by the user who created it. To view all the credentials you own, follow the steps below:
- From the application menu, click on My Credentials.
- A list of all credentials you own will be displayed.
You can assign a credential to a project, and all users with access to that project will be able to use it. However, note that a credential can be available to all users in a given project for use, but only the owner can edit it.
To view credentials available to a given project, follow the steps below:
- From the application menu, click on Project Dashboard.
- Select the project for which you would like to see the credentials.
- After the project loads, from the application menu, click on Credentials.
- A list of all credentials available to a selected project, will be displayed.
Editing a credential
OpenFn allows you to edit or make changes to existing credentials. To edit a given credential, follow the steps below:
- From the application menu, click on Credentials or My Credentials.
- Find the credential you would like to edit.
- On the bottom-left corner of the credential card, click on Edit.
- See details about types of credentials and other editing options here.
Transferring credential ownership
In OpenFn, a credential is owned, by default, by the user who created it. However, OpenFn allows you to change ownership of a credential to another user of the portal. To transfer credential ownership to another user of the OpenFn portal, follow the steps below:
- From the application menu, click on Credentials or My Credentials.
- Find the credential you would like to transfer ownership.
- On the bottom-left corner of the credential card, click on Edit.
- While on the credential detail page, scroll down to the bottom left corner of the page and click on Ownership Transfer.
- Enter the email address and user number for the new credential owner. This information can be found on the recipient's account settings page
- After entering email address and user number, click on the Transfer Ownership button.
- OpenFn will prompt you to confirm wether to proceed with the transfer or not.
Note that once you proceed with credential ownership transfer, you will lose access to the credential immediately. The new owner may be able to view or modify personal or sensitive information stored on this credential.You will not be able to regain access to this credential without the new owner.
However, you will still be able to use this credential for jobs in the projects to which it has been shared until and unless the new owner revokes that project's access to the credential.
Granting/revoking credential access to a project
Note that, by default, a credential is available to the project the user had loaded at the time the user was creating the credential. However, OpenFn allows you to grant or revoke access to a credential for one or more projects. To grant or revoke access to a credential for a project, follow the below steps:
- From the application menu, click on Credentials or My Credentials.
- Find the credential you would like to edit project access.
- On the bottom-left corner of the credential card, click on Edit.
- While on the credential detail page, find the Manage Access section on the right side of the page.
- You will see a list of projects that you are a member of. Mark the
checkboxto grant access or un-mark thecheckboxto revoke access for a given project.
Deleting a credential
OpenFn allows you to delete an existing credential if you own it. To delete a given credential, follow the steps below:
- From the application menu, click on Credentials.
- Find the credential you would like to delete.
- On the bottom-left corner of the credential card, click on Edit.
- While on the edit page for the selected credential, click the trash icon on the top right corner of the page.
- The application will prompt you to confirm whether you would want to proceed with deleting the given credential.
Note that if you proceed with deleting a given credential, OpenFn will delete this credential immediately for security reasons. You will not be able to restore the credential once this is done, but you may create a new credential with the same login information. If jobs are currently using this credential, they may not run successfully until you add a new credential and assign it to those jobs.
Creating a new credential
To create a new credential, follow the steps below:
- From the application menu, click on Credentials or My Credentials.
- Find a blue floating button with + icon, and click on it.
- Clicking the + button will prompt you to choose the type of credential you would like to create.
- Note that credentials are meant to be used to connect to other systems. So choose the type of credential that corresponds to the system you will be integrating with via OpenFn.
- After choosing the type of credential, OpenFn will open the New Credential Form for you to enter the details.
- See details about types of credentials and other editing options here.
Activity
In this section of the portal, you can view a list of all "runs" - i.e. individual job runs. This list is essentially a compilation of all jobs, messages and credentials flowing through your OpenFn account towards your destination system(s).
Runs
Runs are attempts made on a destination system by running a receipt through a
Job Description. Runs can be viewed and re-processed. Each submission has a
success, started_at, finished_at, job_description_id, and receipt_id
attribute. Started_at and finished_at are the timestamps when the submission
began and ended.
Note: Some runs may take a really long time, particularly if they are performing multiple actions in a destination system or if they are fetching lots of data from a REST api at the start of a migration. They will appear as red if they have failed. In the case of failure, refer to our Troubleshooting section below.
Filter runs in the Activity view
You can filter the run logs in the Activity View by:
-
Text - Remember to be patient as a full log text search can take time process. Leverage this feature to search for runs with specific error messages to support with troubleshooting any failed runs.
-
Date - Filter the view to only show runs that failed in the last few hours/ days/ year – or a custom date range! Note that the default activity history view shows runs from the last 30 days.
Bulk reprocess (retry) runs
Need to re-process a series of runs? This could be helpful if you had multiple runs fail due to an error message.
-
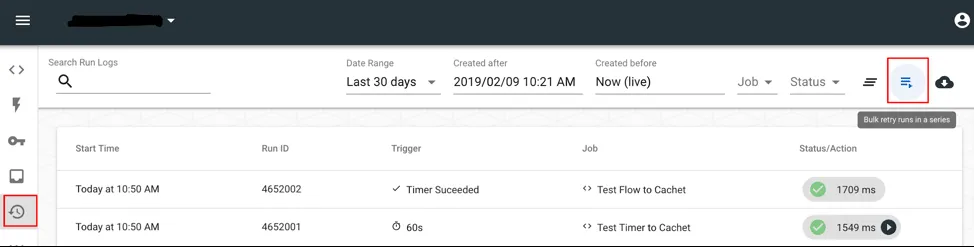
Generate a list of the runs that you want to reprocess by adjusting the filters—be sure to specify an exact date range, job, status, etc.
-
Simply click the Reprocess button and review the dialog that appears. This dialog contains important information about the query that will be used for reprocessing and gives you an approximate number of runs that will be reprocessed.
- Click "Reprocess" when you're happy with the query. You'll get feedback on the number of runs enqueued within seconds, and you should see your project queue fill up then empty over time as the batch is processed.
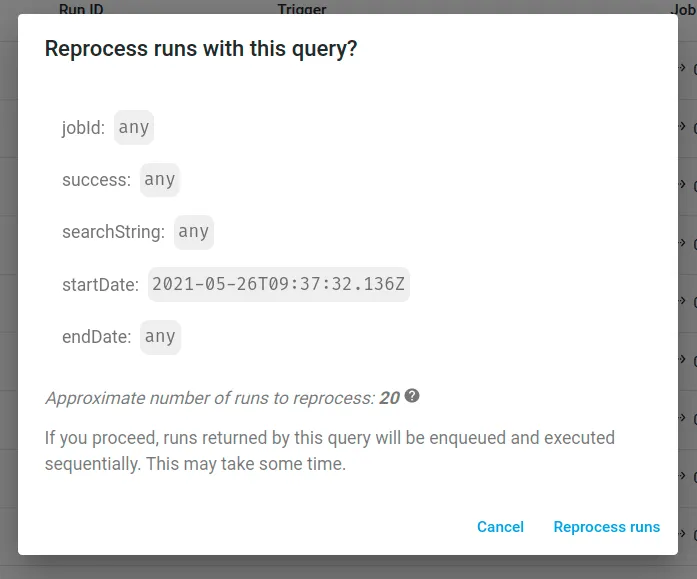
Note that a filtered list of runs will include runs triggered by message filters, cron, and flow or catch triggers. When you select to reprocess runs from a filtered list, the runs in that list which can only be triggered by the successful or failed exit of another run will not be included in the initial batch. Those jobs will, however, still get run if they are turned on and successful or failed runs in the batch trigger them. In other words, flow/catch triggers will behave normally even during a bulk reprocess order.
Remember that OpenFn plans are run-based, and you can monitor usage in Project Settings to ensure that you don’t hit any run limits when bulk reprocessing!
Export runs to CSV
You can download and review OpenFn runs data by exporting to a CSV file.
-
In your activity history view, filter the runs you’d like to export to CSV. Choose to filter by text, date, job, and status.
-
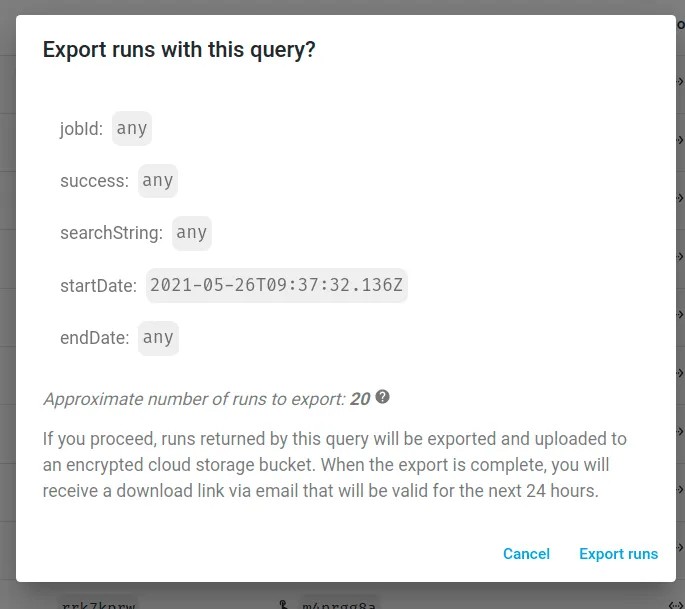
Click the Export as CSV button to review and confirm the desired export.

- Click the "Export" button to submit the request. A link to download the file will be sent to your email address shortly.
Inbox
Your inbox contains the history of all messages that have passed in to your project, which may or may not have triggered a specific job. Messages are stored payloads or data that were sent via HTTP post to your inbox. They can be viewed in formatted JSON, edited, or manually processed (if they did not match a filter when they were originally delivered.)
To edit a message, click the "pencil and paper" icon next to that receipt. Be careful, as no original copy will be persisted.
Filter messages in your inbox
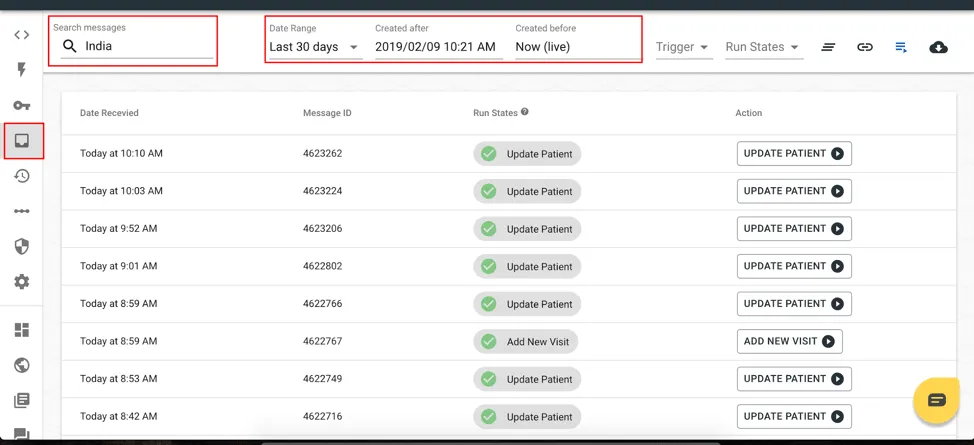
To help you more quickly find relevant messages, you can now filter your inbox by:
- Body Text - Search your messages for specific text (e.g., find surveys that contain “India” in the body). As individual projects may have millions of messages containing tens of thousands of lines of JSON each, we’ve implemented a “tsvector” search strategy. Please be patient and note that this text-based search may take a moment to return results.. If you’re curious about how tsvector works from a technical perspective, check out the official documentation.
- Date - Choose a relative date range (e.g., “Last 90 Days”) or define a custom date range yourself. Note that the default inbox view shows “Last 30 Days”.
Bulk reprocess messages
Need to re-run a series of messages? If you had a job fail because of an error for multiple messages, or need to re-process the data in OpenFn to re-send to a destination application, then this feature will help you do so more quickly!
-
Generate a list of the messages that you want to reprocess by adjusting the filters—be sure to specify an exact date range, the matching trigger, etc.
-
Simply click the Reprocess button and review the dialog that appears. This dialog contains important information about the query that will be used for reprocessing and gives you an approximate number of messages that will be reprocessed.

- Click "Reprocess" when you're happy with the query. You'll get feedback on the number of messages enqueued within seconds, and you should see your project queue fill up then empty over time as the batch is processed.
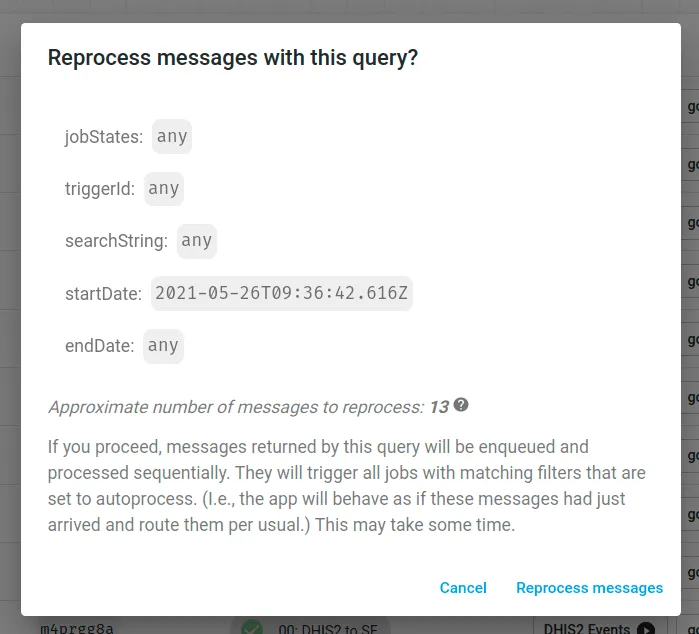
Note when bulk reprocessing messages
-
This simulates the chain of events that starts when messages first arrive in your inbox. In other words, reprocessed messages will be handled by message filter triggers for any jobs that have the
autoprocesssetting “on”. If you've got messages that match certain triggers, but the associated jobs are switched "off" they will not be run when those messages are reprocessed. -
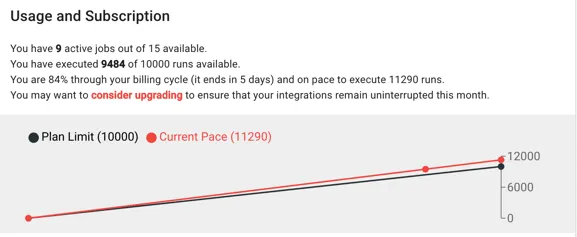
Remember that OpenFn plans are run-based, and you can monitor usage in Project Settings to ensure that you don’t hit any run limits when bulk reprocessing!
Export messages to CSV
You can now download and review OpenFn message data by exporting to a CSV file.
-
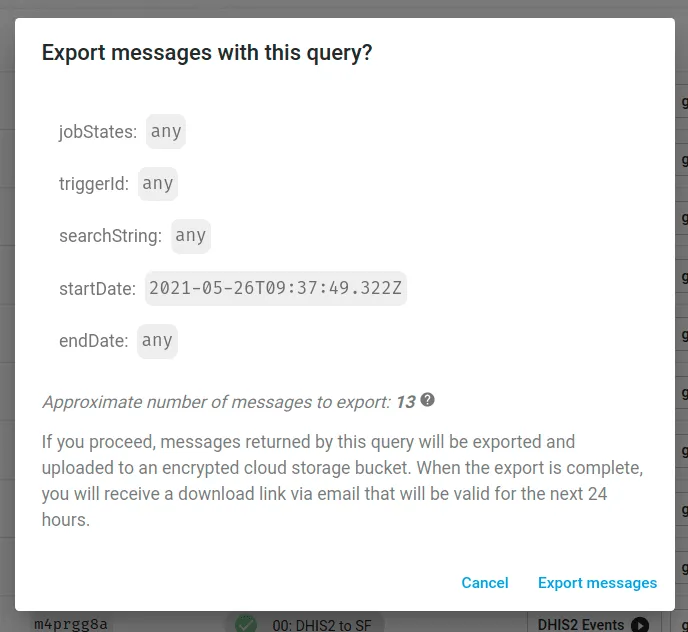
In your inbox, filter the messages you’d like to export to CSV. Choose to filter by text, date, trigger, and run state.
-
Click the Export as CSV button to review and confirm the desired export.

- Click the "Export" button to submit the request. A link to download the file will be sent to your email address shortly.
Search Console
The Search Console allows users to answer questions such as Did patient 798123 get successfully referred or Did CommCare submission 123e4567-e89b-12d3-a456-426614174000 get loaded into DHIS2? via direct string search.
Searches via Inbox and
Activity History rely on JSONB matching and
tsvector, which are more powerful for traversing very large date ranges of
messages or run logs but are less intuitive than string searches.
The Search Console solves this challenge and allows the user to type the
string of concern in a Search Box and press enter. OpenFn will search in
message bodies and run logs, by default, and/or in message headers if
otherwise specified.
To use the Search Console, follow the below steps:
- On the left menu pane, click on Search Console link.
- While on the Search Console page, select the Date Range and enter the text matching your search in the Search Box.
- Press the Enter Key on the Keyboard or click the Search button to search.
OpenFn will limit the results of your search to a maximum of 10 records per
specified search type (i.e. OpenFn will return a maximum of 10 results for
matches found in bodies, logs, or headers). It is therefore recommended to
refine your search to a very specific string and date range for which a
matching result is expected.
Account Management
Add a credit card
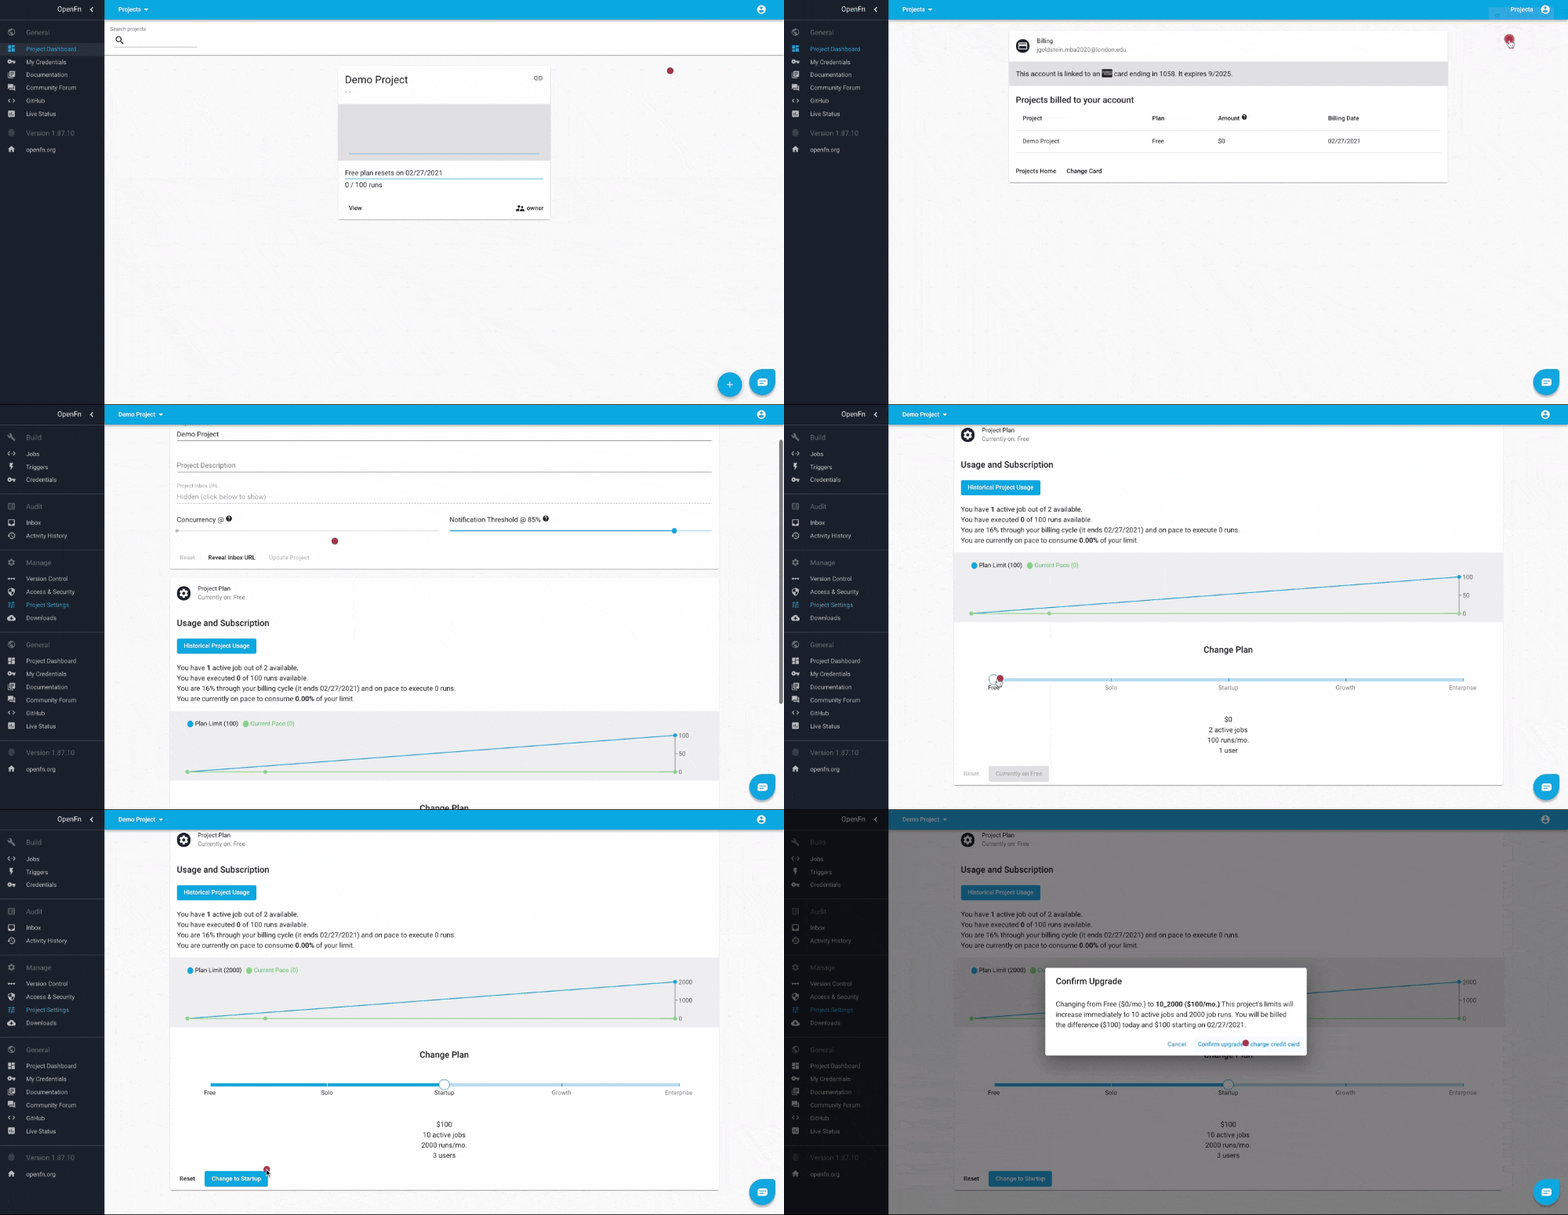
OpenFn's hosted iPaaS has a free-forever tier, but if your organization requires more jobs or runs each month, you can add a credit card and change to a paid tier. For comprehensive pricing information please visit our pricing page.
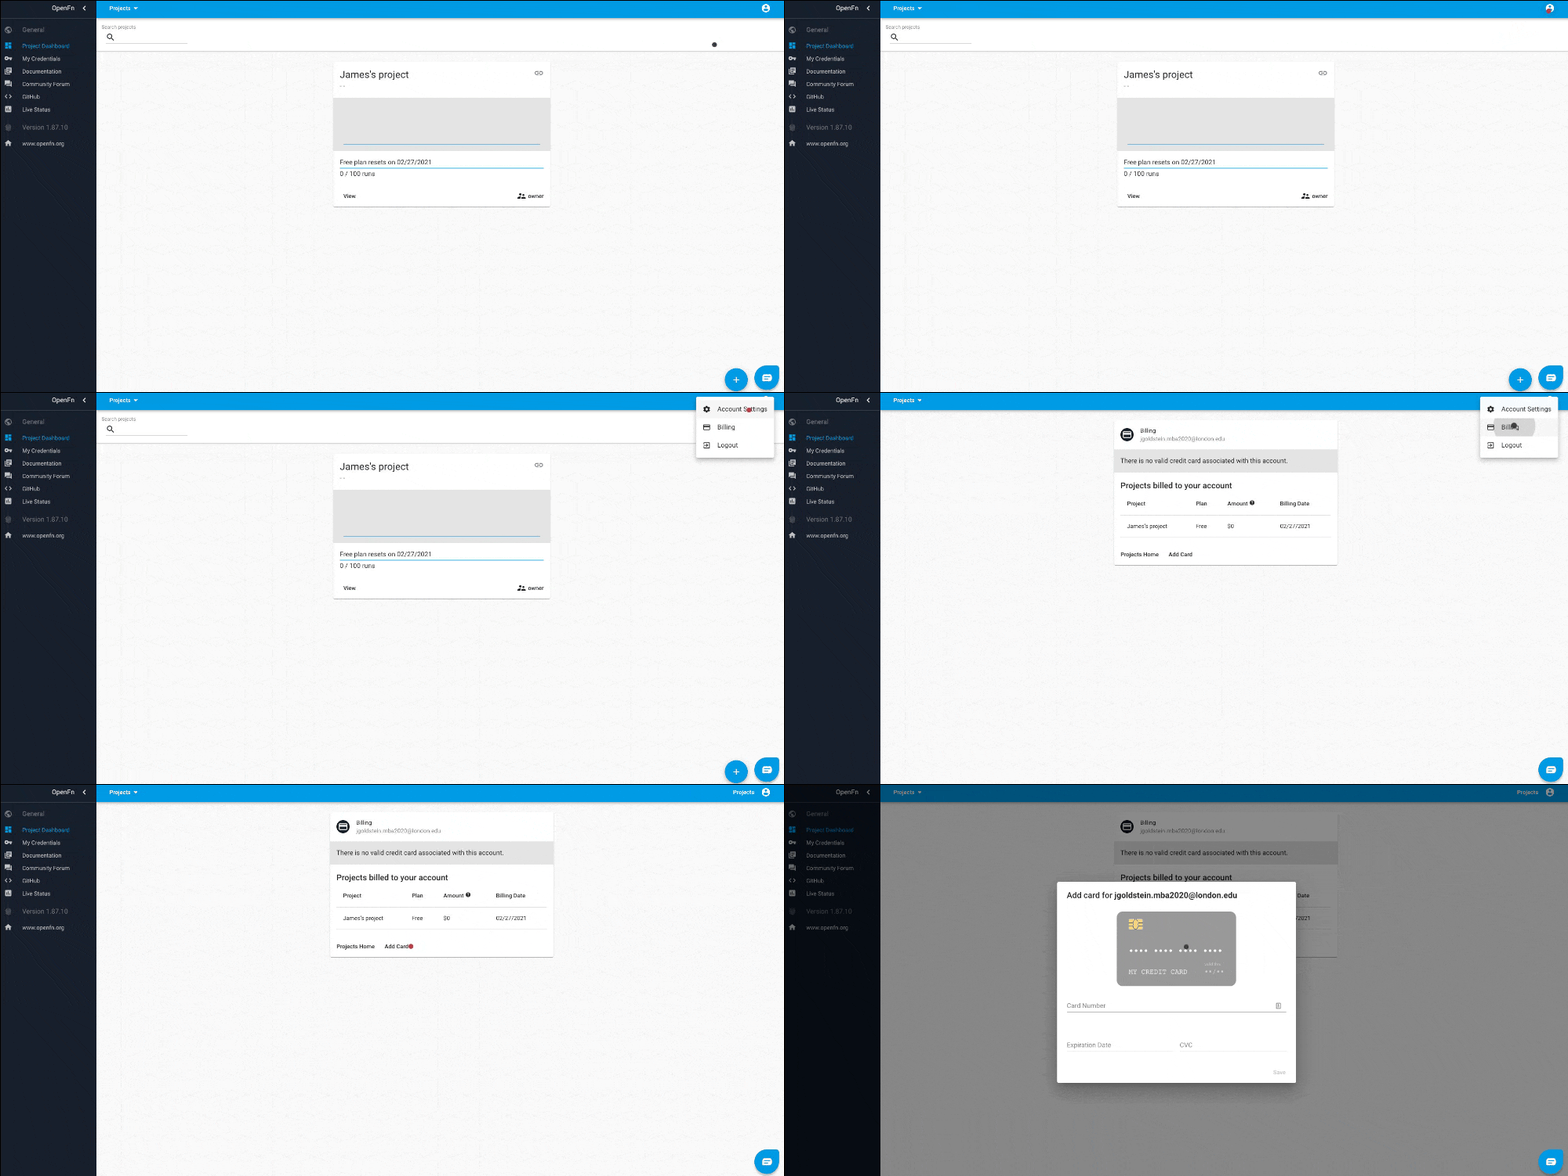
To enter your credit card information follow these steps:
- Login to your OpenFn account.
- Click on your profile icon on the top right corner o f the page and select Billing.
- From the Billing page select Add Card and enter your credit card information.
Change plan
Once your credit card information is entered you can upgrade your plan by navigating to the Project Settings page and dragging the slider to the right or left.
To following these steps:
- Login to your OpenFn account.
- Click on the Project Settings link on the left-hand menu of the project you'd like to modify. (Or click your profile icon on the top right corner of the page and select Billing and select the project that you would like to upgrade.)
- This will take you to the Project Settings menu.
- Scroll down on the Project Settings page and change plans using the slider.
- Once you have selected the desired plan, click Change to [plan name] and then confirm the change.
Lost password
If at any time you forget the password for your OpenFn account follow these steps to reset it:
- Visit https://openfn.org/login .
- Enter the email address associated with your account.
- Click on Recover Password (see gif below). This will trigger OpenFn to send a recovery token to your associated email account.
- Check your email for the recovery token and make a copy of it.
- Enter your recovery token and a new password into the OpenFn "Reset Password" page.
Project settings
This section of OpenFn platform allows you to view and update the project configuration and plan settings.
Project Configuration
To view or update the following project configuration details, follow the steps below:
- From the application menu, click on Project Settings and then find the Project Configuration section.
Changing Project Name
- Changing your project name will update the URL and, after a 60-day deprecation period, will break bookmarks or old links to the project. This won't affect your project's inbox URL, but may impact users with lots of old run or message links saved offline.
Viewing Project Inbox URL
- To view the
Inbox URLfor your project, click on the eye icon against theUnique Inbox URLlabel.
Changing Project Description
- Project description is optional but can be updated under this section.
Changing Concurrency
- Concurrency is the number of jobs that will be run at the same time.
Think of it as the number of workers or employees performing the same task at your organization. The task may be to convert an inbound patient record to meet the FHIR standard, then load it into OpenMRS. You could have 10 files waiting to be processed from separate deliveries. With a concurrency of 10, all ten files would start to be processed immediately. With a concurrency of 1, they'd be processed sequentially, the second only being started once your single worker finished working on the first.
-
Projects are set to a concurrency of "1" by default. This means that runs will be processed one-at-a-time and that each subsequent run will be blocked until the previous run is completed.
-
If your project is subscribed to a paid plan, you have the option of toggling concurrency from the default "1" all the way up to a concurrency of "10".
-
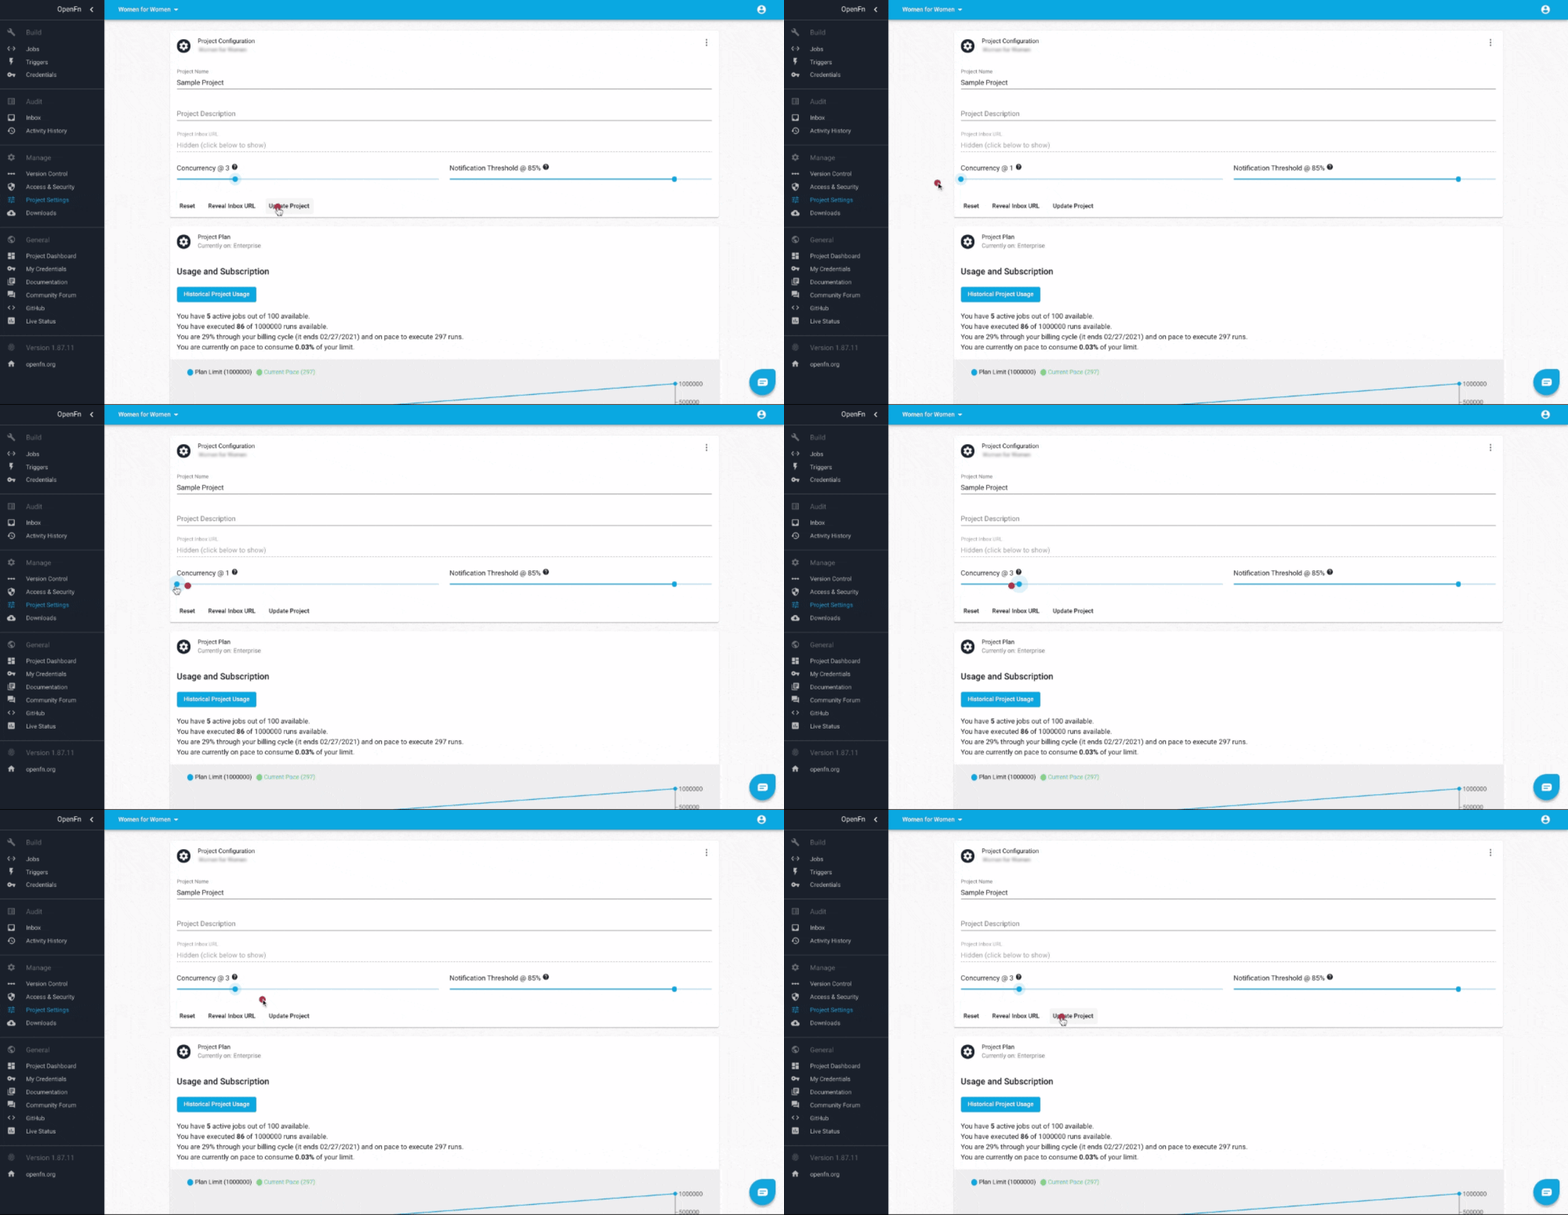
To change the concurrency level for your project follow these steps:
- Login to your OpenFn account.
- Click on the Project Settings link on the left-hand menu of the project
- you'd like to modify.
- This will take you to the Project Settings menu.
- On the Project Settings page change concurrency to the appropriate level using the slider.
- Once you have selected the desired concurrency, click Update Project.
Changing Notification Threshold
- By default, OpenFn sends a notification to all project collaborators when 85% of the project's allowed runs have been used in a given billing cycle. You can change this setting by adjusting the Notification Threshold Slider to your desired level.
- Once you have selected the desired notification threshold, click Update Project.
Exporting Project Config
- OpenFn allows you to run your project as a Microservice .
- There are two options for exporting the project config used in OpenFn
Microservice. Exporting as
project.yamlwill provide you with aYAMLfile that can be used to run this project with OpenFn/engine, OpenFn/microservice, or for use in another OpenFn/platform space. - Exporting as
microservice.zipwill prepare aZIPfile withopenfn/microservice:latest(from hub.docker.com) and a yourYAMLfile inside a pre-configured directory structure so that you can run this project as a microservice viadocker run. In both cases, your project configuration will be built asynchronously and you'll receive an email with download link when it's done.
Project Plan
- In this section, you can view and change your project's pricing plan.
Usage and Subscription
- This section provides you with a graph that shows your project's current plan usage limit and current usage pace.
- To view detailed report of the project's usage, find and click on the Historical Project Usage button.
Change Plan
- By default, OpenFn sets your project's plan to Free.
- Before changing your project's subscription plan, you must add a valid credit card.
- To change the project's plan, find the project plans slider and click on the plan of your choice.
- After selecting the project plan, click on the Add Card button and enter card details in the form and save.
Job Library Sharing
- The OpenFn Job Library is a project supported by the OpenFn community. It's a collection of open-source job code from projects across ICT4D.
- You will always able to browse the library so that writing jobs is faster and easier, but by enabling library contributions for this project, jobs not marked as "private" will also be published to the library.
- Contribute to the job library, on the top-right corner, find the library icon and click on it.
- Click on the Yes, contribute to the job library button of the dialog box that appears.
Data from messages or runs are NEVER shared. Your job expressions (which most OpenFn users already keep in public repositories on GitHub) and other non-sensitive metadata (e.g., adaptor and version, created/updated dates) will be made searchable to help other organizations and governments write jobs more quickly and easily if you enable this setting.
User Account Menu
- You can view and modify your account settings by clicking on the person icon on the top right corner of the App bar.
Changing User Account Settings
- To change your user account settings, such as name, IDE Style, and theme, click on the Account Settings of the User Account Menu. This action will take you to the Account Settings page.
- While on the Account Settings page, make the necessary changes and click on the Save button to save the changes.
- Note also that, while on the Account Settings page, you can access additional features such as Changing Email, Changing Password, connecting and disconnecting to GitHub, Billing Management, and Deleting Account.
- To access these additional features, open the sub-menu by clicking on the three dots on the top-right corner of the Account Settings page.
Viewing Billing
- The User Account Menu also allows you to view details of all projects billed to your account.
- To view a list of all projects billed to your account, click on the Billing menu item.
Logging-out
-
You can logout of OpenFn by clicking on the Logout menu item of the User Account Menu.
notaAlso note that OpenFn will log you out of your current session after 24 hours without warning! It also ensures that you are logged-out of all browser tabs, once your current login session expires.
Access & Security
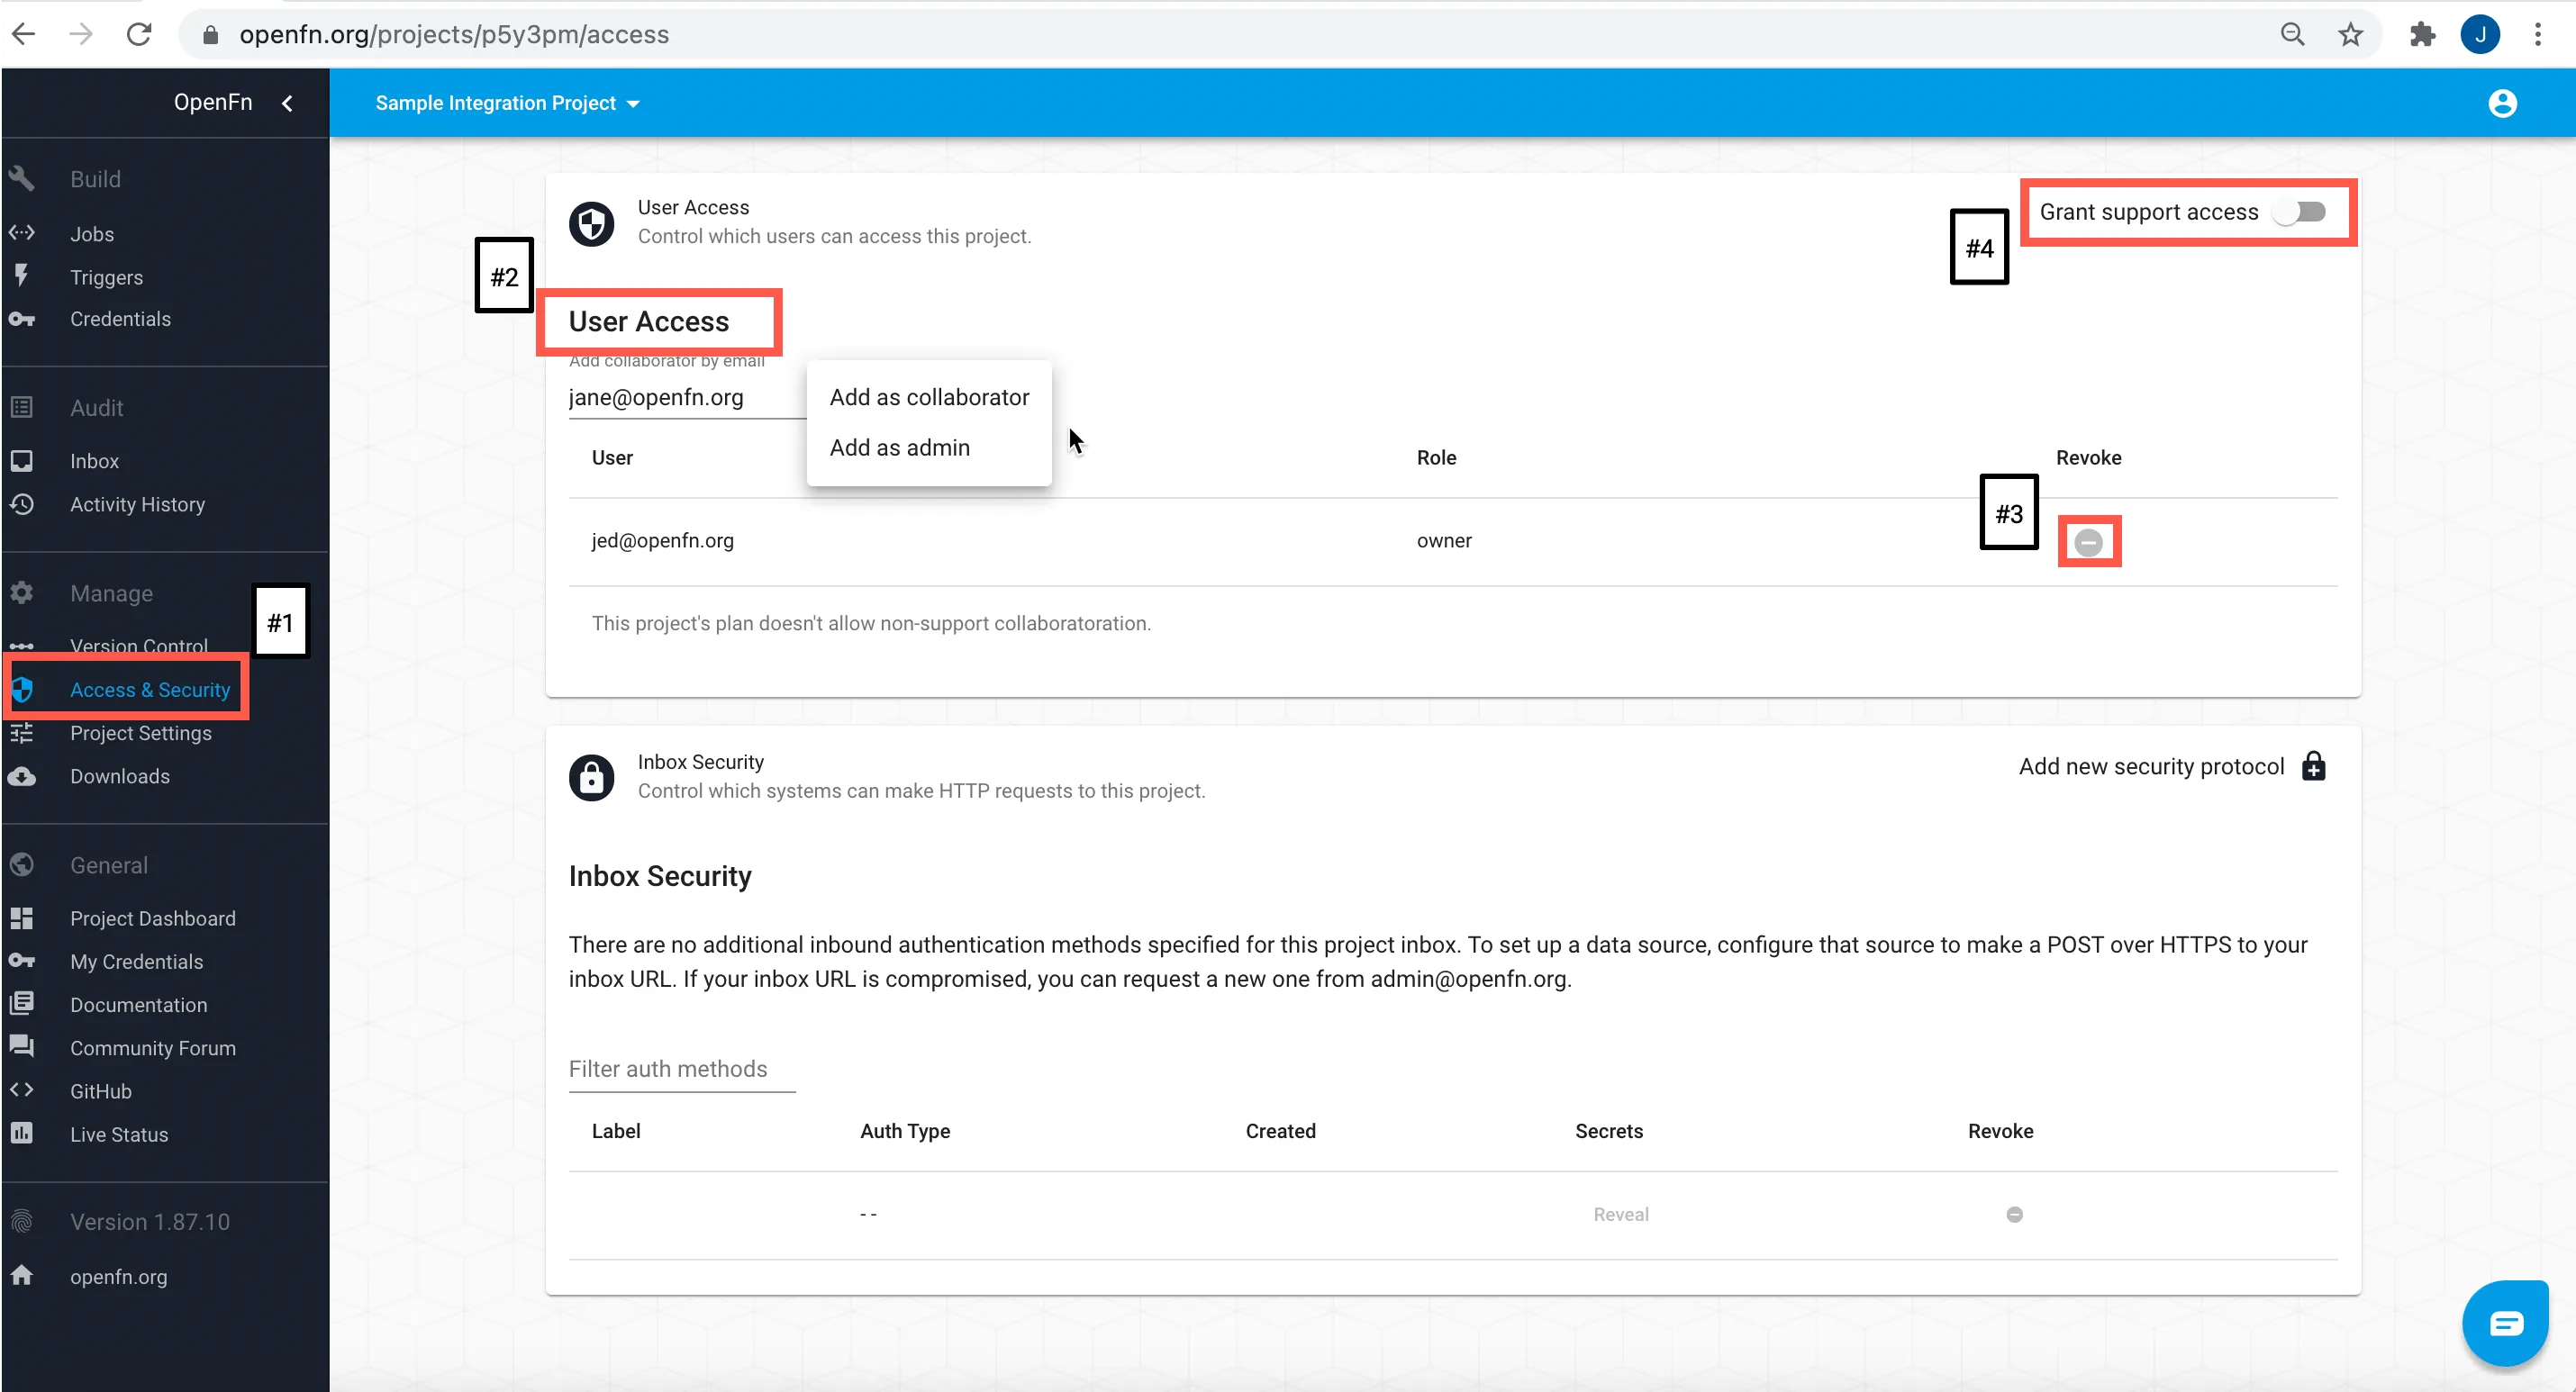
This section covers the Access & Security features each OpenFn project has. To explore these features, on the left hand navigation ribbon click on the Access & Security tab (#1).
Please refer to the screenshot below for help navigating the functionality of this page.
User Access
OpenFn provides users with the ability to add collaborator access, revoke collaborator access, and, in the event you get stuck and need help from an implementation specialist, grant OpenFn support access.
Add collaborator access
To add collaborator access to your project from the Access & Security page:
- Enter the e-mail address of your collaborator in the "Add collaborator by email" field. Note that you will need to select "add as collaborator," or add as administrator" to add him/her to the project. See the screenshot above for reference (#2).
Revoke collaborator access
To revoke collaborator access to your project from the Access & Security page:
- Find the collaborator's name in the User list and in the Revoke column click on the on the Revoke button. See the screenshot above for reference (#3).
Grant OpenFn support access
To add OpenFn support team's access to your project from the Access & Security page:
- Enable the Grant support access toggle (#4).
Inbox Security
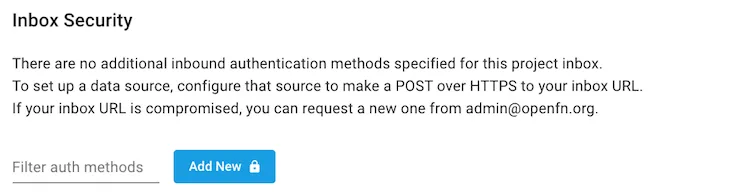
OpenFn project administrators can choose to configure additional authentication
for any inbound requests made to the project's inbox URL. In the "Access &
Security" page of their OpenFn project, Administrators can choose from API Key
and Basic Auth types, which will prompt administrators to either generate an API
token or to setup a username:password credential. Once this inbox authentication
is configured, any HTTP requests made to the OpenFn Inbox URL must include
either this x-api-key token or username:password in the request header.
Rotating auth methods
Because more than one auth method may be accepted at a given time, some organizations choose to periodically rotate their auth methods for extra security and can do so without disrupting live production integrations. To rotate your inbox auth methods:
- Create a second valid auth method with a new token or user:pass combination.
- Provide that token to your external systems so that they can start using it in their webhooks/requests to OpenFn.
- Once you are certain that all external services are now using the new auth token, revoke the old auth token.
You can repeat this process as frequently as is required by your organization's internal security protocols.
GitHub version control
Managing large numbers of jobs with multiple contributors is complicated. We developed the GitHub integration so that OpenFn projects can be linked to GitHub repositories and you can work collaboratively on your jobs, incorporating git flows for management.
OK, you're ready to manage your jobs via GitHub, the leading hosted version control software on the web? Great, this section describes the steps necessary to get going.
-
If a commit is made to a designated branch on GitHub,
✅ OpenFn will automatically update the associated job's expression to match the file on GitHub.
-
If a job's expression or GitHub filepath is modified on the platform,
✅ OpenFn platform will automatically push a commit to your GitHub repo, updating the linked file to match the expression.
Note that if you change a file on GitHub that's not related to any OpenFn jobs, no update will be made on OpenFn. Likewise, if you edit a job on OpenFn but don't make any changes to the expression or GitHub filepath, no commit will be made on GitHub.
As soon as you enter a valid filepath for a job in a project with a connected GitHub repo, all modifications made to that job on OpenFn will appear as GitHub commits on that branch in that repo.
Likewise, as soon as you make a commit on GitHub with a change to a file that is linked to a job on OpenFn, the contents of that file will overwrite the existing job on OpenFn.
⚠️ PLEASE note that before you connect GitHub, there is no version history
for OpenFn jobs on the platform. If you commit something you don't want (like an
empty file) to GitHub, autodeploy is on, and that file is linked to an OpenFn
job, you will erase your existing job and you may not be able to retrieve
it. ⚠️
For this reason, and because OpenFn/cli provides a free, open-source, offline testing environment, it's recommended to create your jobs using a GitHub repo and test them on your own machine before linking them to a project on OpenFn.
Setup Steps
Linking your OpenFn account to your GitHub account
- OpenFn: User Settings: Click the three-button "action menu" (top right corner of the account card) and select "Connect to GitHub".
- GitHub: When prompted by GitHub, grant OpenFn read and write access to your/your organizations repositories as needed.
- OpenFn: Once redirected to OpenFn you may be asked to re-authenticate depending on the domain you originally used to connect to OpenFn.
- OpenFn: Ensure all changes you've made to your account are saved, and verify that you see a bright blue check next to "GitHub OAuth".
Linking projects and jobs to GitHub repos and files
- OpenFn: Project -> Version Control: Specify the repository owner, repository name and branch for automatic deploys. You can also select to turn on or off automatic deploys: when on commits to the branch specified will automatically be written to your jobs on OpenFn.
- OpenFn: Project -> Jobs -> Job Edit: To link an individual job to a file in a
GitHub repo, edit that job and paste in the path to the job from the root of
your GitHub repo. If your repo looks like this, you'd type
sample_job_1.jsorsome_folder/some_other_job.jsto link your OpenFn job to the select file in your repo.
Automated GitHub version control is currently only available for enterprise users. Contact enterprise@openfn.org to build a custom plan for your needs.
Advanced Version Control
Using this GitHub integration, you can revert to previous versions of a job by selecting that version (by its commit date and SHA) on the job view page. A new commit will be made, updating the job to the state it was in at the time of the old commit.