Lightning Quick-Start (v2)
This tutorial takes ~15 minutes to complete, and teaches you how to build workfows with OpenFn Lightning. If you get stuck, post a question to our community forum.
1. Register
Register for an account on app.openfn.org and follow the link sent to your inbox to confirm your email.
*If you already have an account, you can login.
2. Understand the sample workflow
Click on the 'sample workflow' created for you on registration.
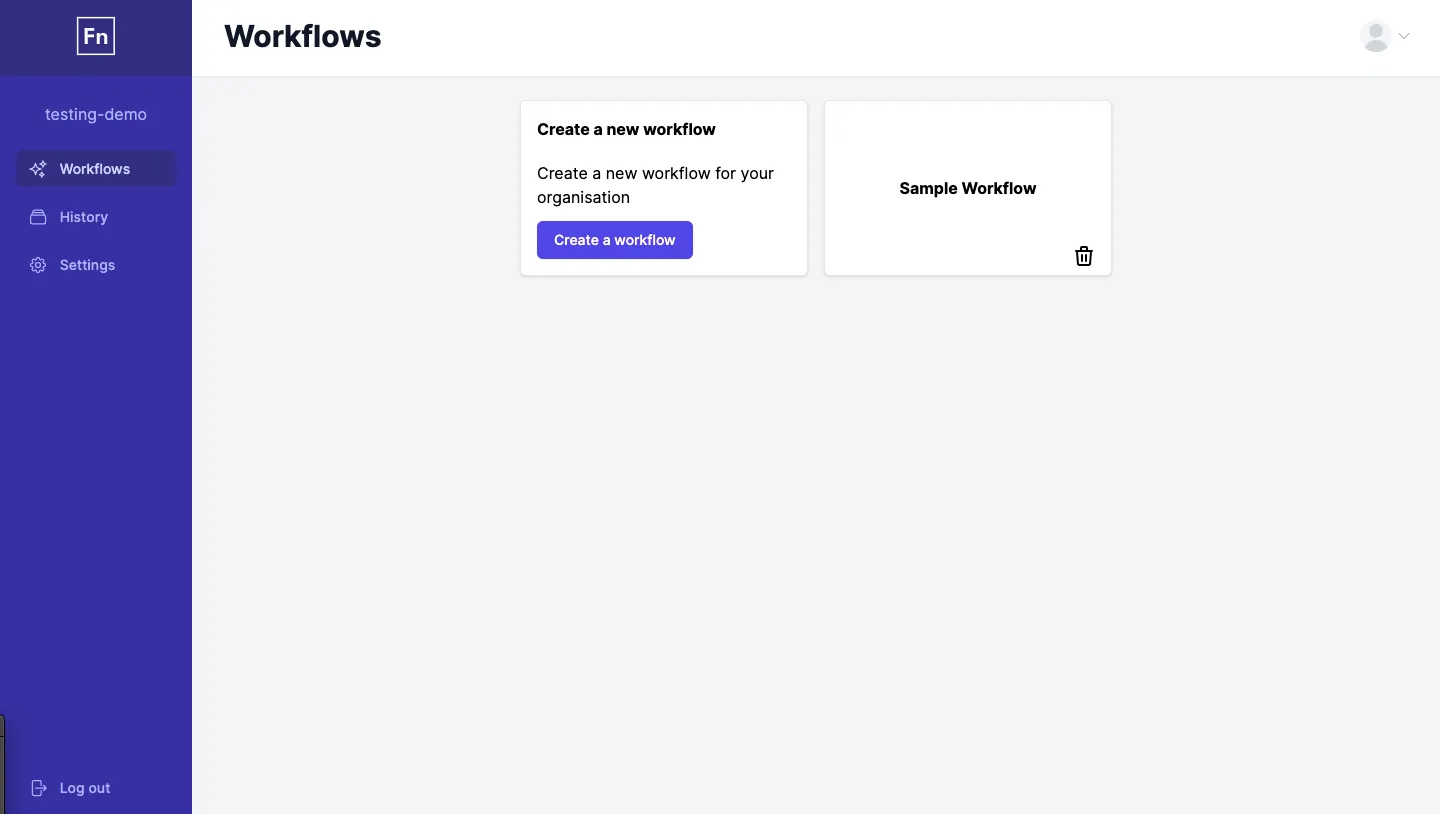
A workflow is a series of tasks to be carried out automatically (i.e a process that has been automated).
The sample workflow pictured below formats and sends data from a source system (KoboToolbox, a mobile data-collection app) to a destination system (DHIS2, a health information management system). It automates patient registration by taking a patient’s name and age and:
- checking if they are over 18 months old;
- converting it to the same format as DHIS2;
- uploading it to DHIS2.
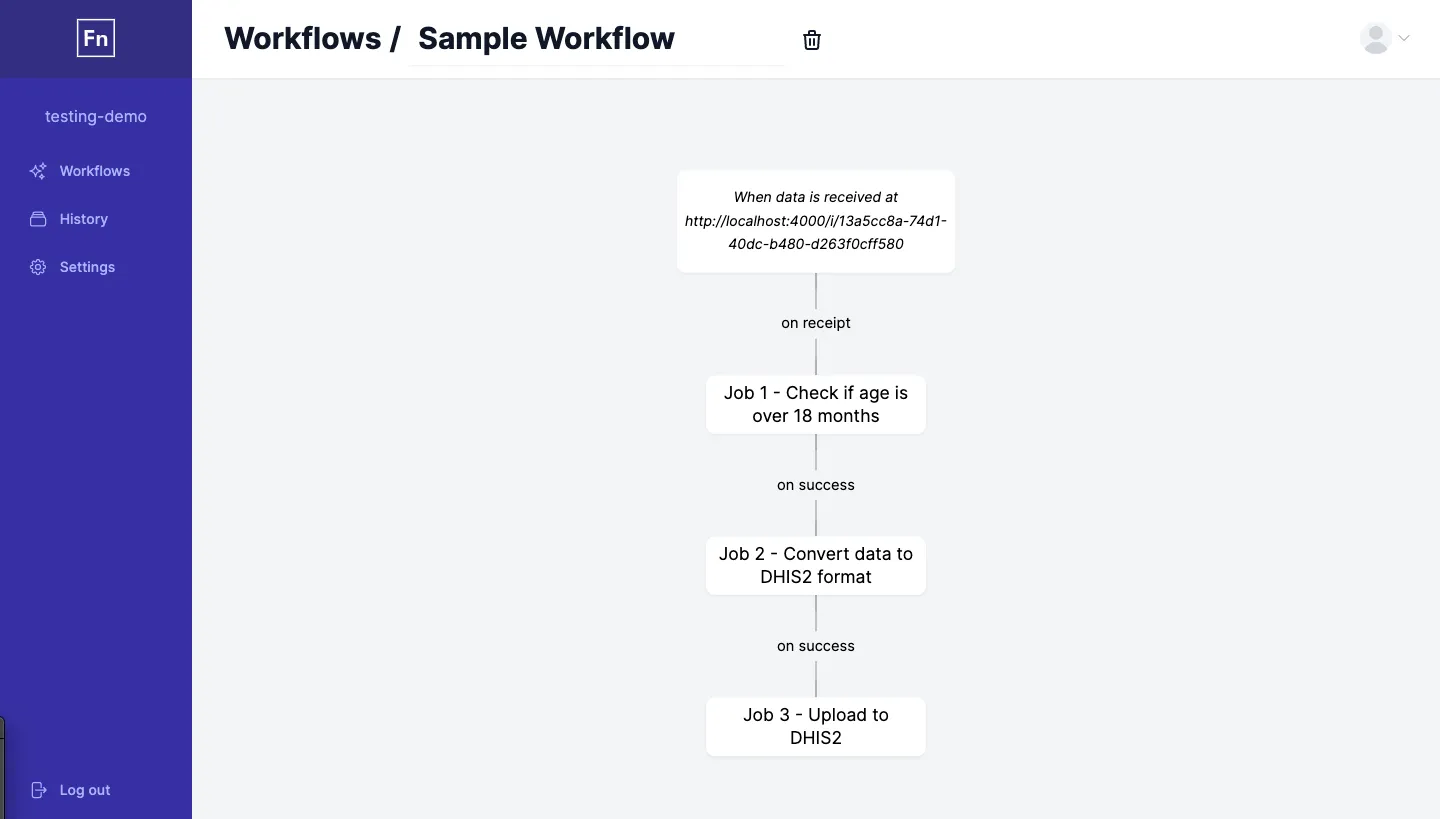
It is made up of 3 jobs.
A job is an action to be carried out at a given point in time. It has a trigger, an adaptor, a credential and a job expression which each define when, where, how and what to do.
Click on Job 3 to view more details about it in the setup and editor tab.
[SETUP TAB]
The SETUP TAB is where you define the when, where and how of your job.
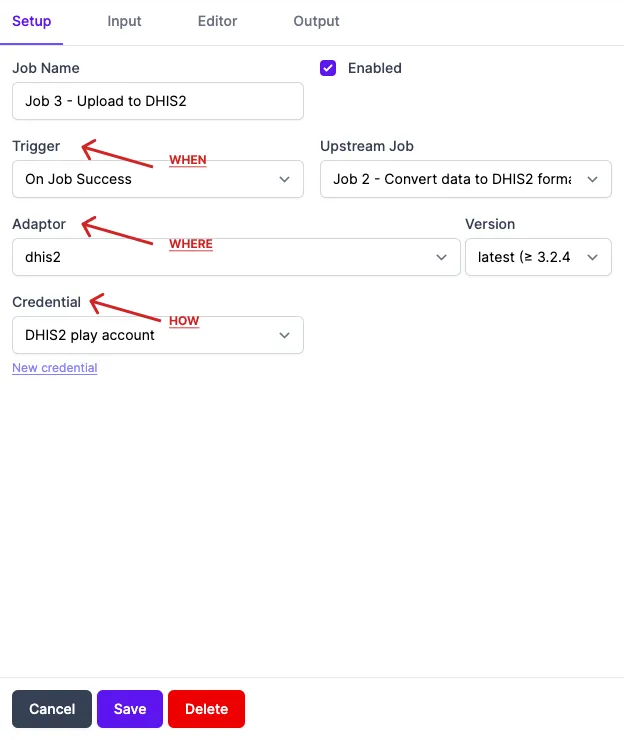
When: trigger
The trigger defines when an action should happen. It can be one of the following:
- When data is sent to OpenFn Lightning from an external system: webhook
- At a recurring point in time: cron
- When the job which comes before it in the workflow succeeds: on success
- When the job which comes before it in the workflow fails: on failure
If you never want the job to run, you can disable it by unselecting the 'Enabled' checkbox.
The trigger for the first job in a workflow will always be either a 'cron' or 'webhook' trigger. All the other jobs will have a trigger of 'on success' or 'on failure'.
Where: adaptor
The adaptor is what helps you communicate with and perform actions in a particular system. In OpenFn, you can carry out an action in the following systems:
- In OpenFn: OpenFn or common adaptors
- In an external system OpenFn has an adaptor for: commcare, DHIS2, google sheets, kobotoolbox ...
- In any other external system which has an API: http adaptor
How: credential
Credentials define how a Job is able to perform an action on your behalf, just as you would need to cover logging in if you were explaining how to carry out an action manually.
If you are performing an action in an external system, you'll need to select the same credential type as your adaptor.
[INPUT TAB]
The INPUT TAB is where you can see examples of data that has been sent to your job during previous runs.
In job 3, we'll be using the data values that are in names which are
"Wycliffe" and "Orao" in this example. Can you see them?
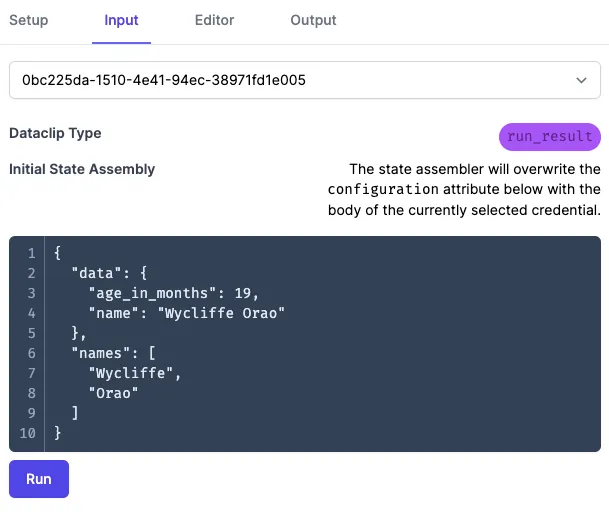
The input data of a job can be accessed through state. For example, if you
want the names values from an input, you can access it at state.names.
[EDITOR TAB]
The EDITOR TAB is where you define what the job should do and which data from state (which contains your input) to use.
When you need to use data that comes from your webhook trigger (data sent from
your external system), cron trigger, or a previous job you can find it in
state. Learn more here.
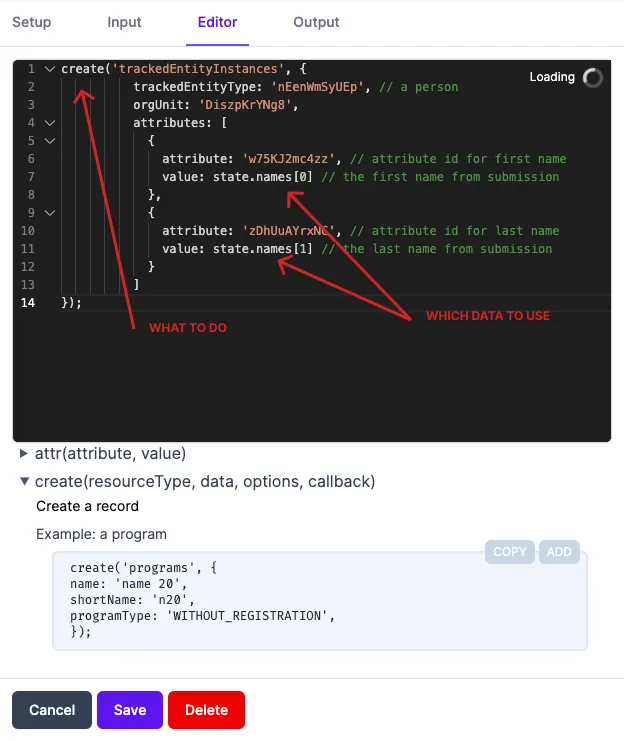
In this job, we're using the names data from state (which we saw in the Input
tab).
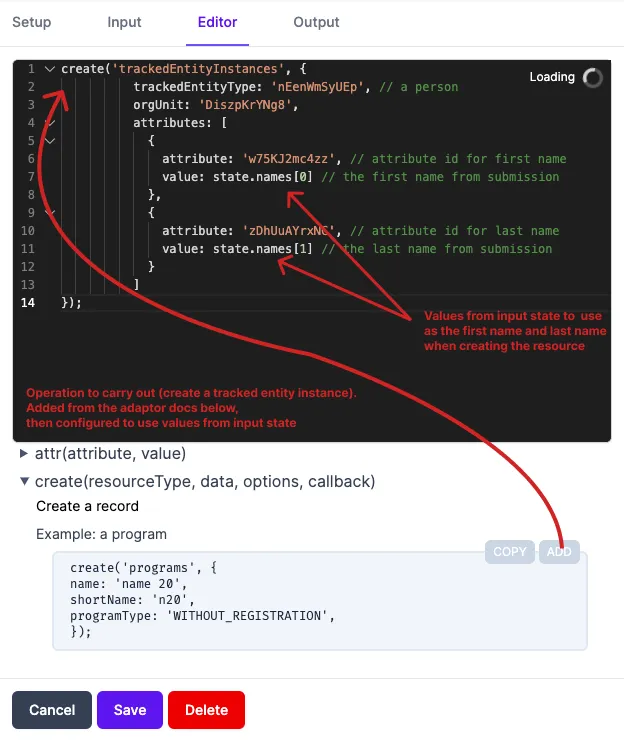
What: Job expression
The job expression defines what action to carry out and which data values to use.
It gets added from the adaptor documentation below the editor as an example operation, and is then configured to use specific values from the state input data. (see image below for details)
3. Run the sample workflow
A workflow will run when the trigger from the first job (represented as the first node on the canvas) is called.
In the case of the Sample Workflow, this is when data is sent to the webhook URL. There are three ways of doing this.
Follow the instructions from one of the options below to run your workflow.
Option 1: Manually send data to your first job trigger
Click on the first job in your workflow, then head to the input tab. Paste the
data below into the custom input, then click run.
{
  "data": {
    "age_in_months": 19,
    "name": "Wycliffe Gigiwe"
  }
}
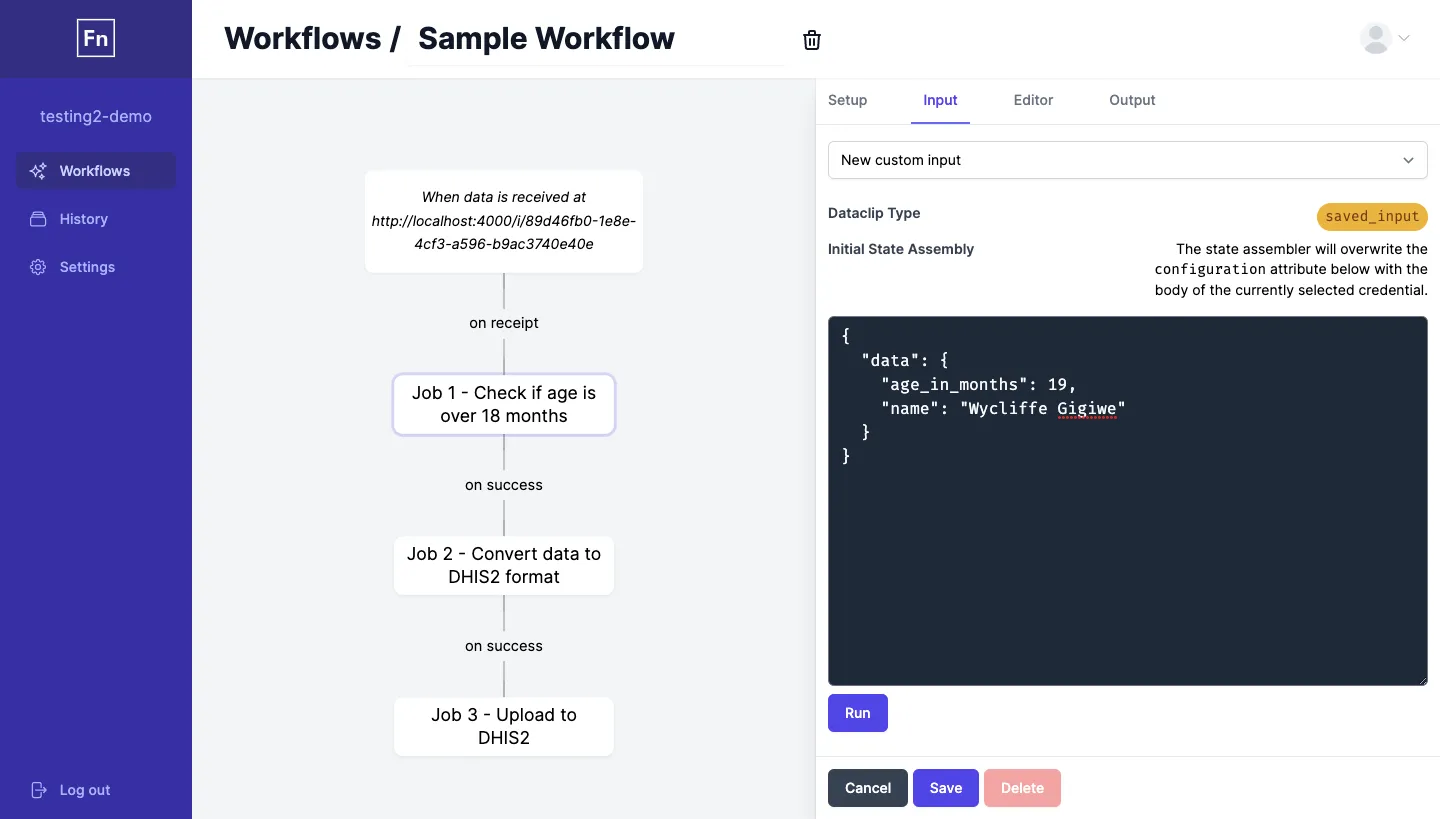
You should now be able to see your request on the history page.
When a job is run, OpenFn adds the input into state (used to get data values in the job expression), along with the credentials which get added to configuration.
Option 2: Send data through a curl request
You can also send data to a webhook URL by making a curl request in your terminal.
Copy your webhook URL by clicking on the first node of your workflow, then use
it to replace YOUR_WEBHOOK_URL in the command below and run it in your CLI.
curl -H 'Content-Type: application/json' \
      -d '{"age_in_months": 19, "name": "Wycliffe Gigiwe"}' \
      -X POST \
      YOUR_WEBHOOK_URL
You should get a response that looks like this, and be able to see your request on the history page.
{
  "attempt_id": "3602a2e6-cd01-4b48-bfa9-5237e7393c90",
  "run_id": "fdebd5a9-3578-4bfd-945e-12e0a24e8c6a",
  "work_order_id": "b1899b6f-e420-479f-a6ae-8641189764cd"
}
Option 3: Send data from your external system
You can trigger a workflow from an external system by configuring it's REST services to send data to your trigger webhook URL.
In the case of our Sample Workflow, we're using KoboToolbox as an external system.
Log into our KoboToolbox demo account with username: openfn_demo and password: openfn_demo. Select the form you’d like to connect ('Lightning sample workflow') and go to Settings -> REST services -> Register a new service.
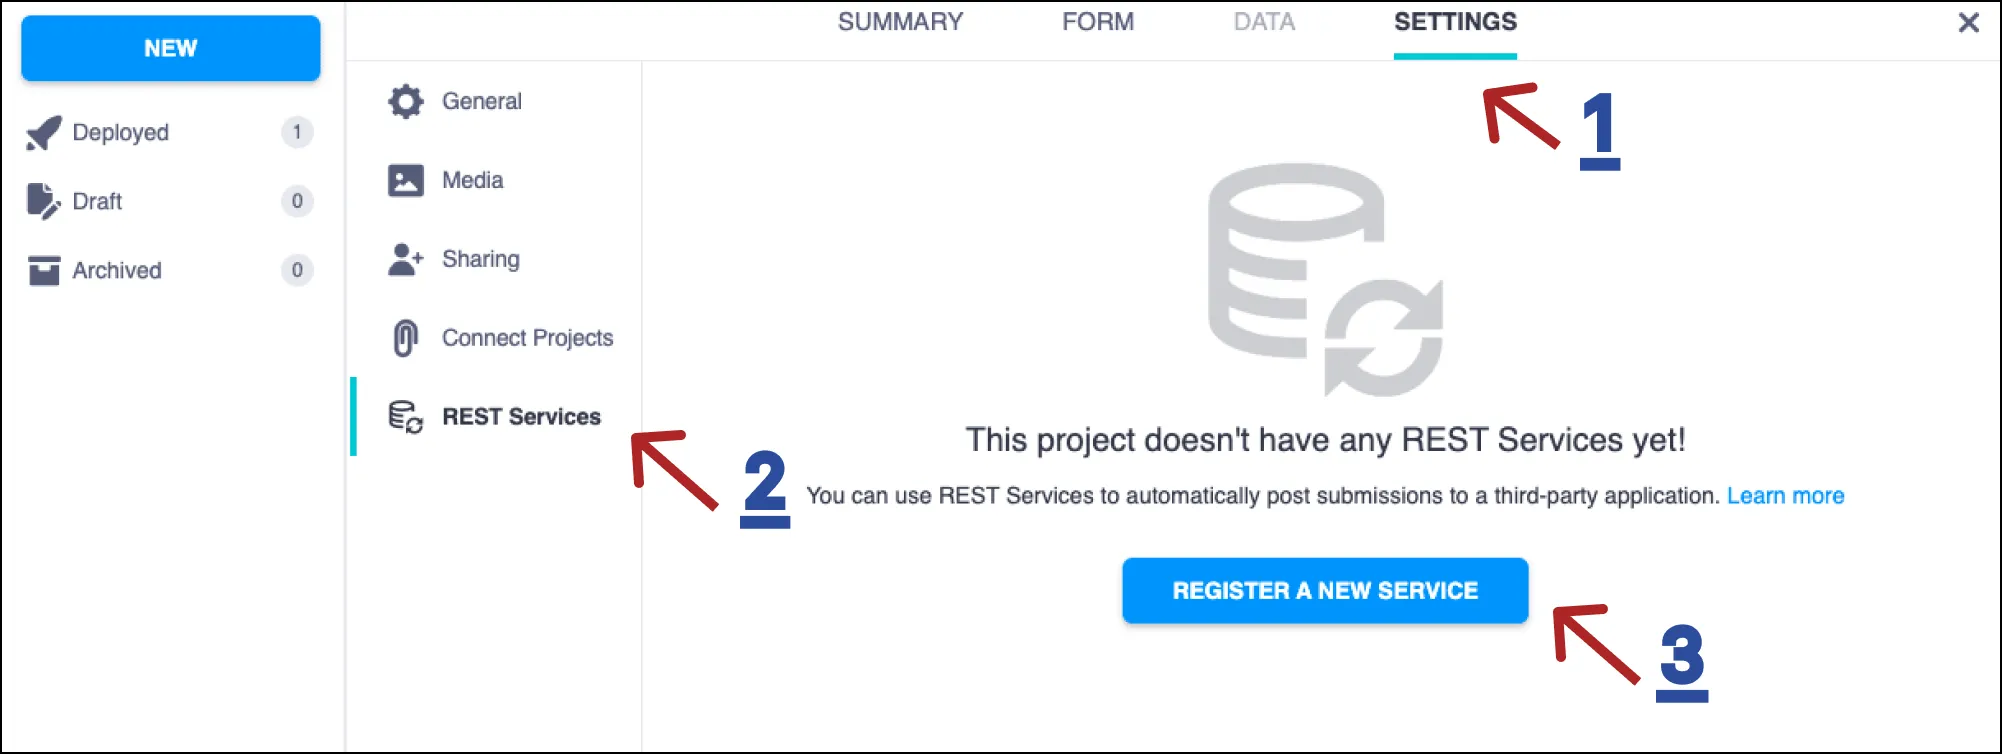
Set the service name to OpenFn and the URL to the webhook URL (you can copy is from the first node on your workflow).
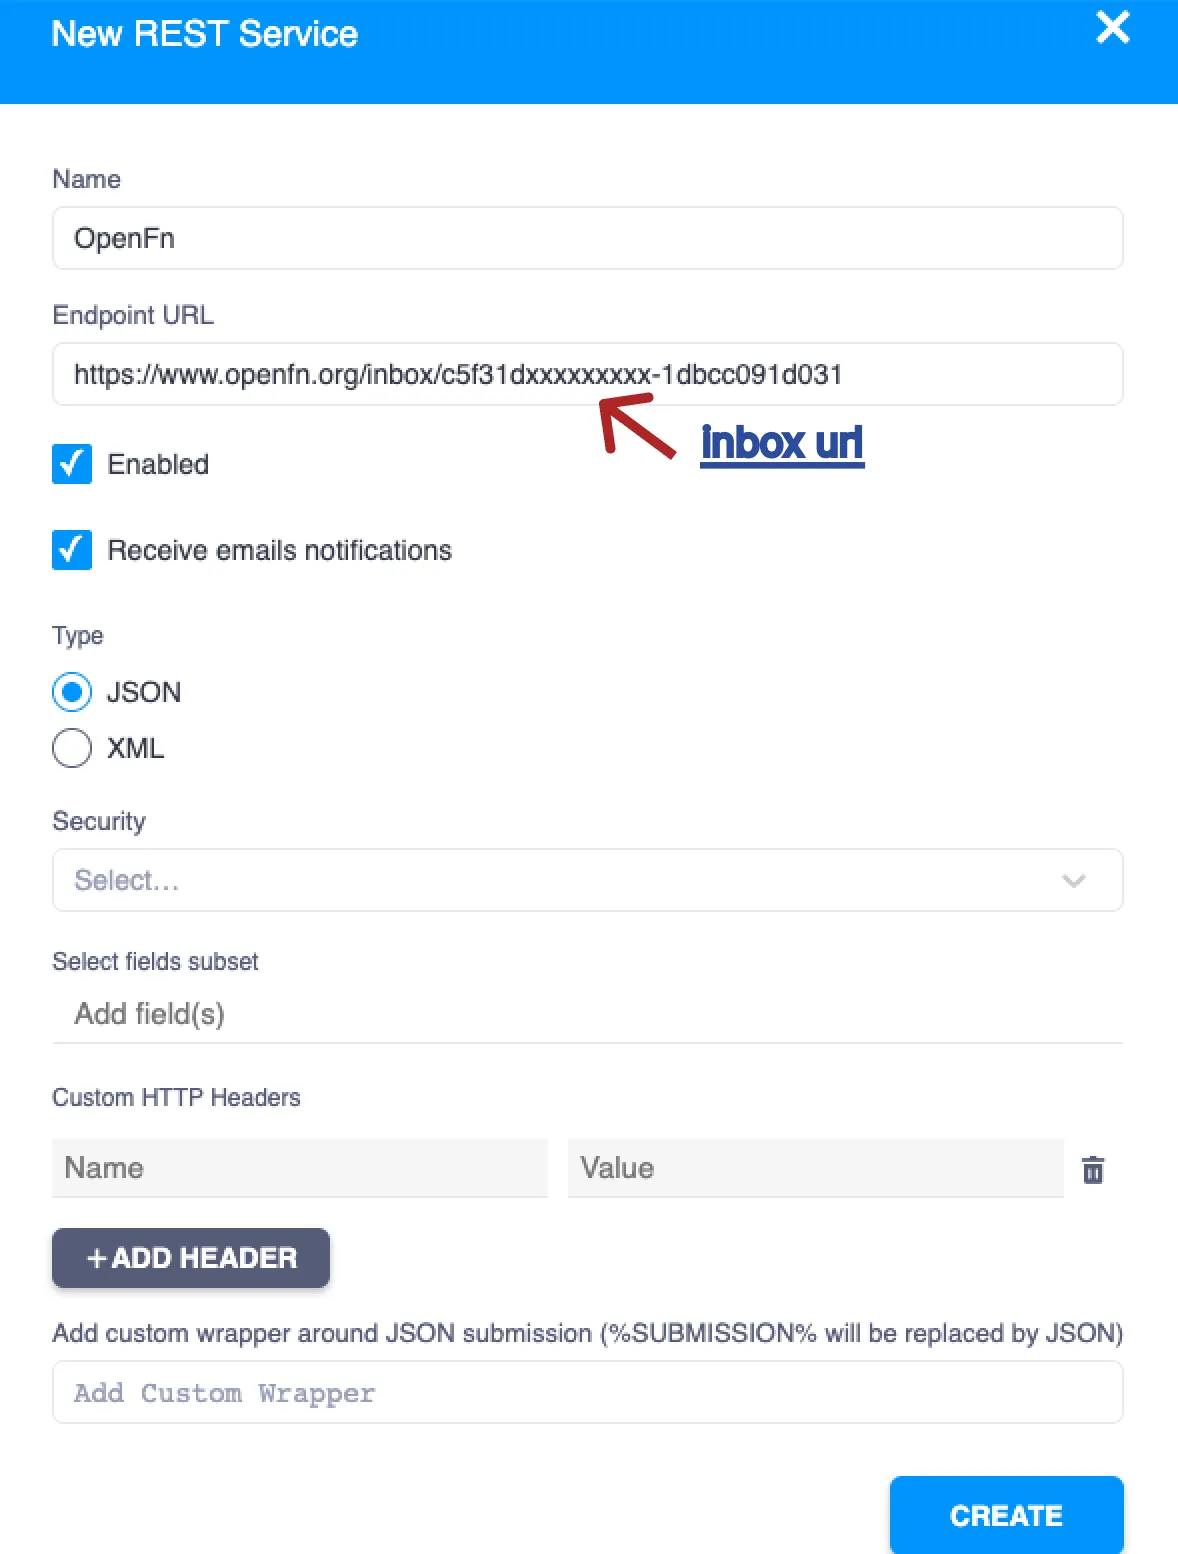
Your form should now be configured to send data to the webhook trigger for your first job whenever a response is submitted. We can test this out by submitting some form responses at Form -> Open.
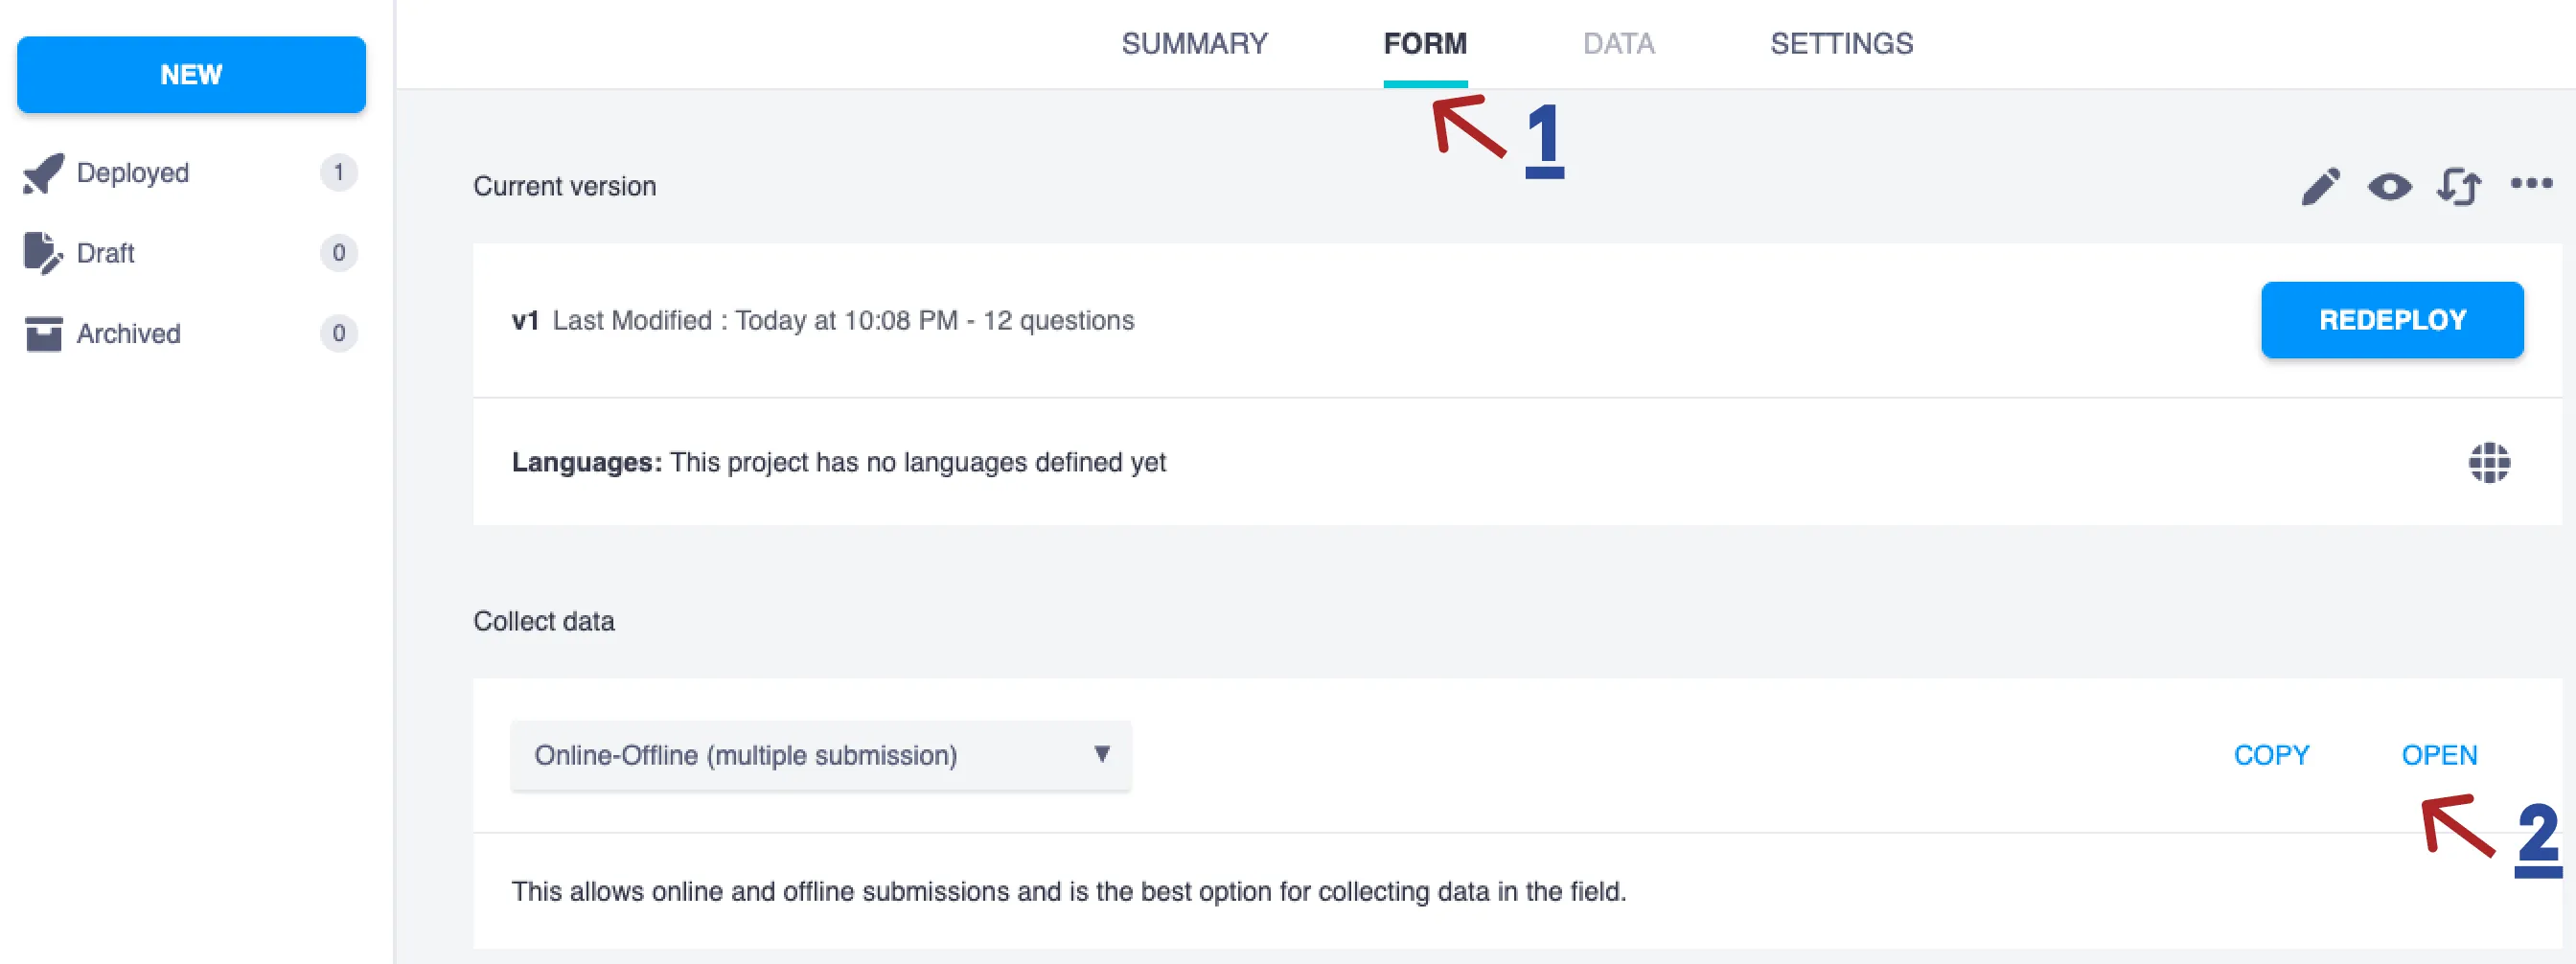
Once you've made a form submission, you should be able to see your request on the history page.
4. Check your request got processed correctly
The history page shows you each work order or request for data to be processed.
Now that you have run your workflow, head to the history page to see the work order. You'll see it has a status of 'Success' which means it got processed correctly.
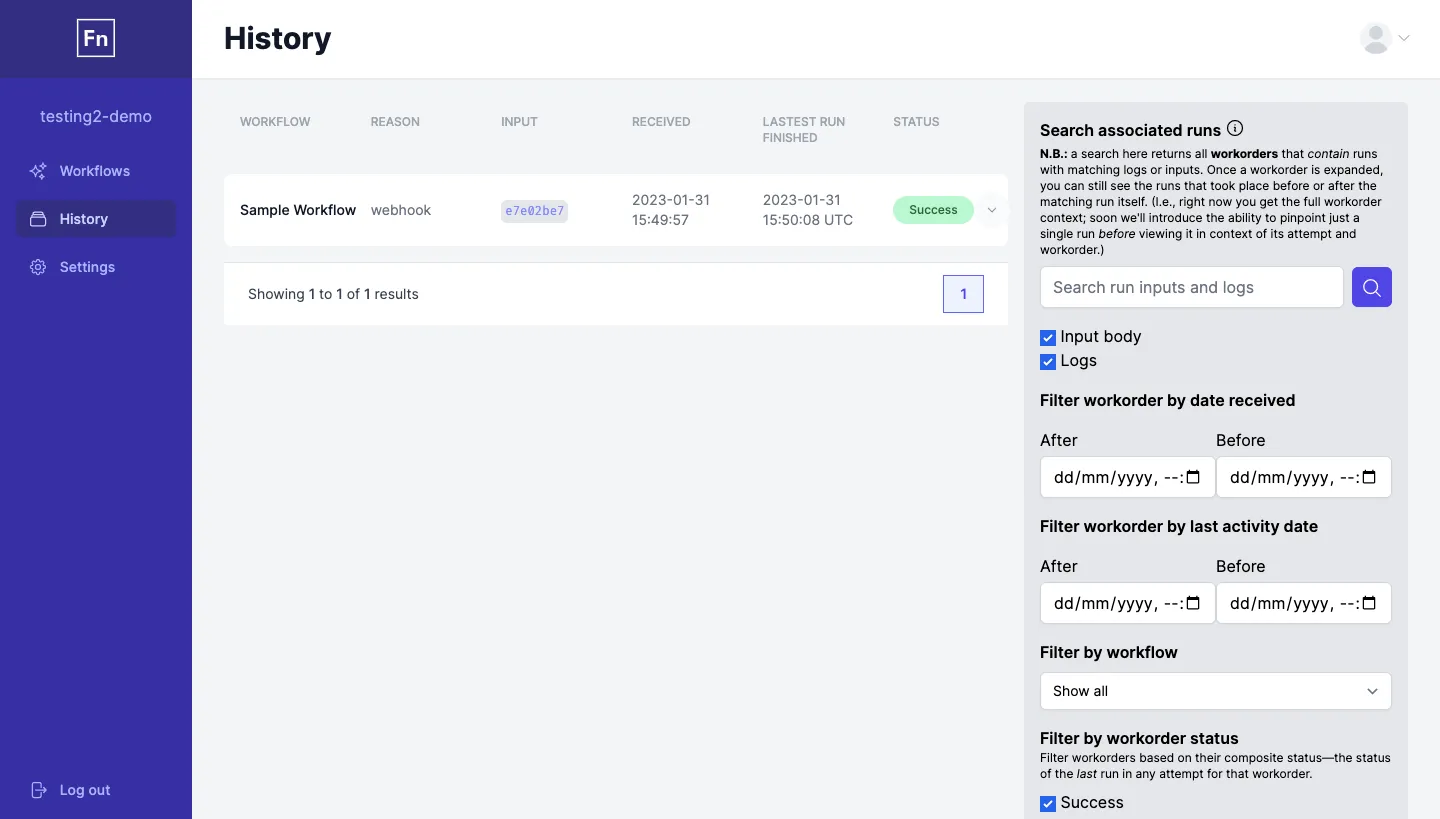
Click on the chevron next to the status to expand it and see each job run.
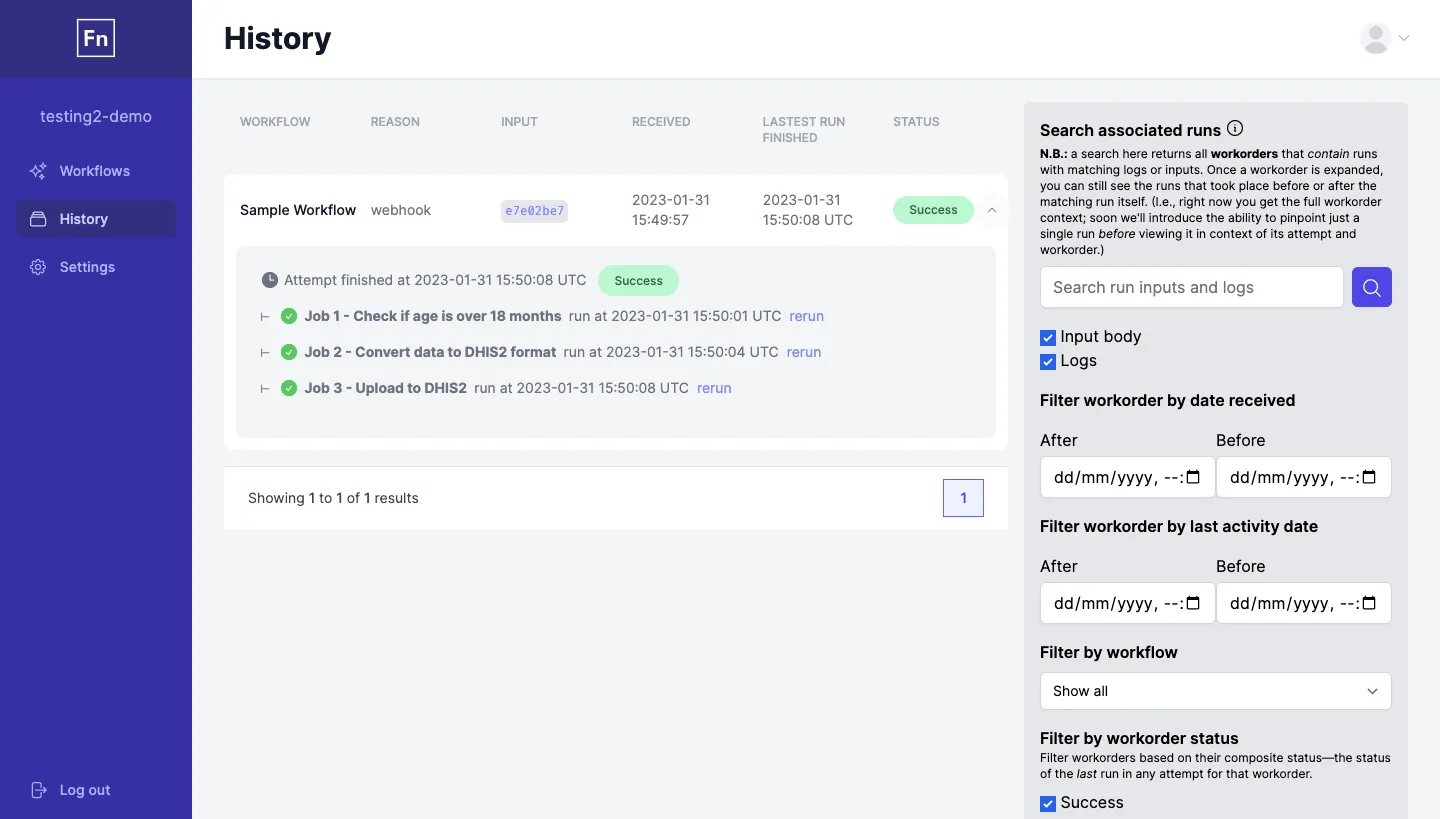
5. Make a run that fails, then edit the job and rerun it to make it succeed
From your workflow page, run the job manually with a patient that is 18 months old using the data below.
{
  "data": {
    "age_in_months": 18,
    "name": "Njoroge Orao"
  }
}
Head to the history page and see that the work order has a status of 'Failure'. This is because the patient is not older than 18 months.
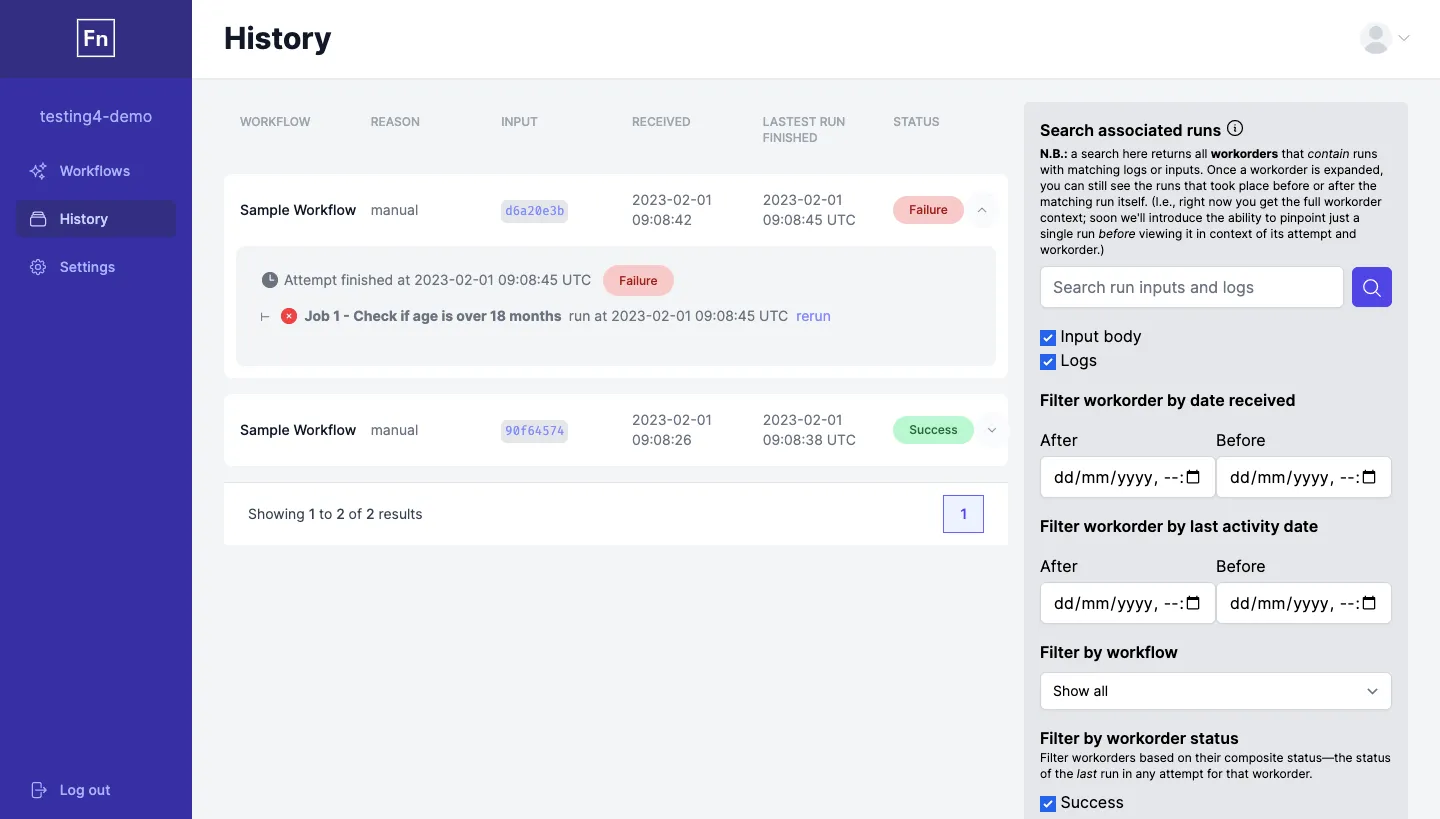
Let's say we made a mistake and actually wanted to register any patient that is both 18 months old and above. We want to edit the job logic and reprocess the request.
Head to the Editor tab in Job 1 to update the logic by changing the if statement
from > 18 to <= 18.
Your Job expression should now be the following:
fn(state => {
  if (state.data.age_in_months >= 18) {
    console.log('Eligible for program.');
    return state;
  } else {
    throw 'Error, patient ineligible.';
  }
});
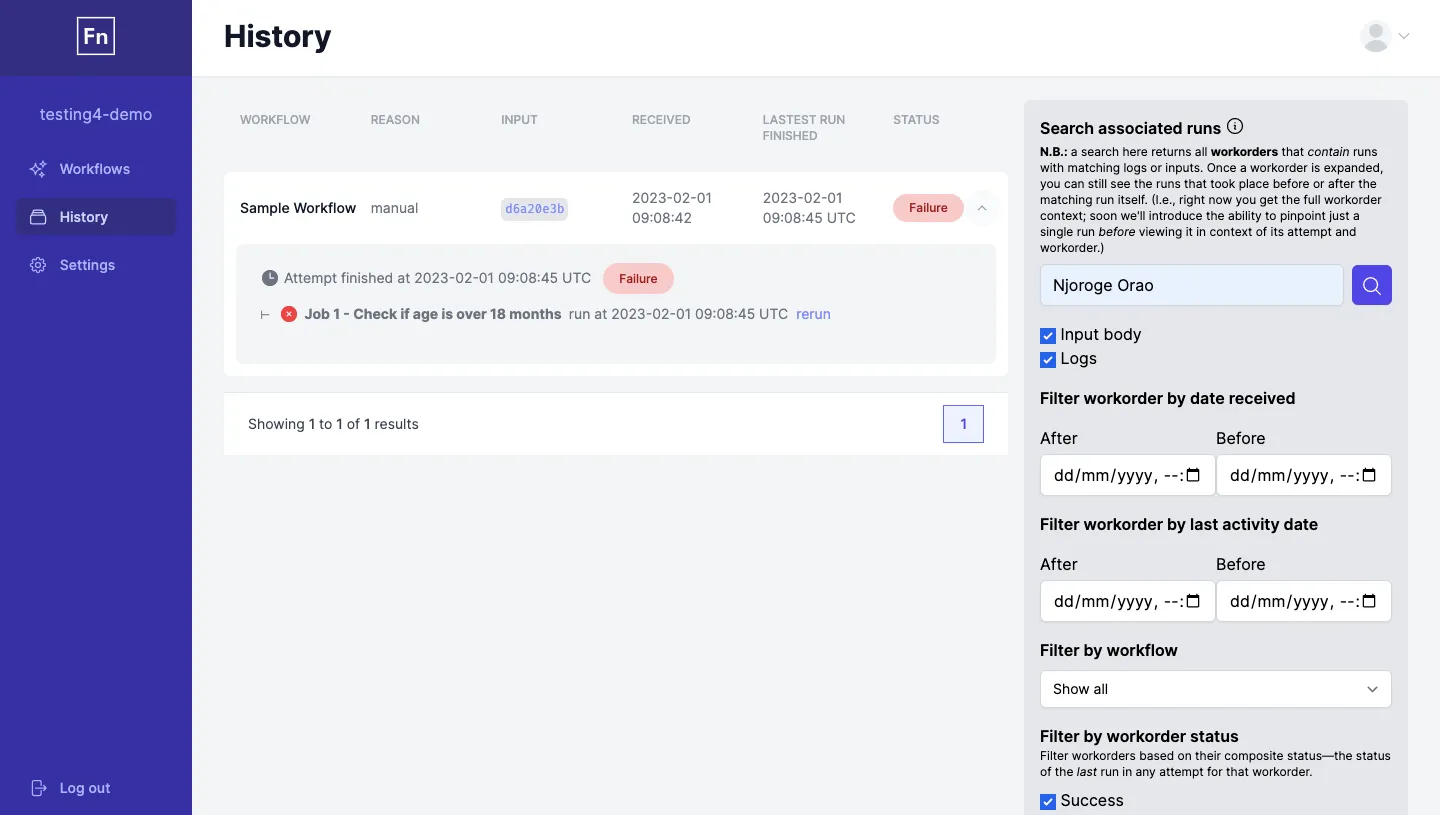
Make sure to click save, then head back to your history page and find the work order you want to reprocess. You can search for "Njoroge Orao" in the search bar to find it.
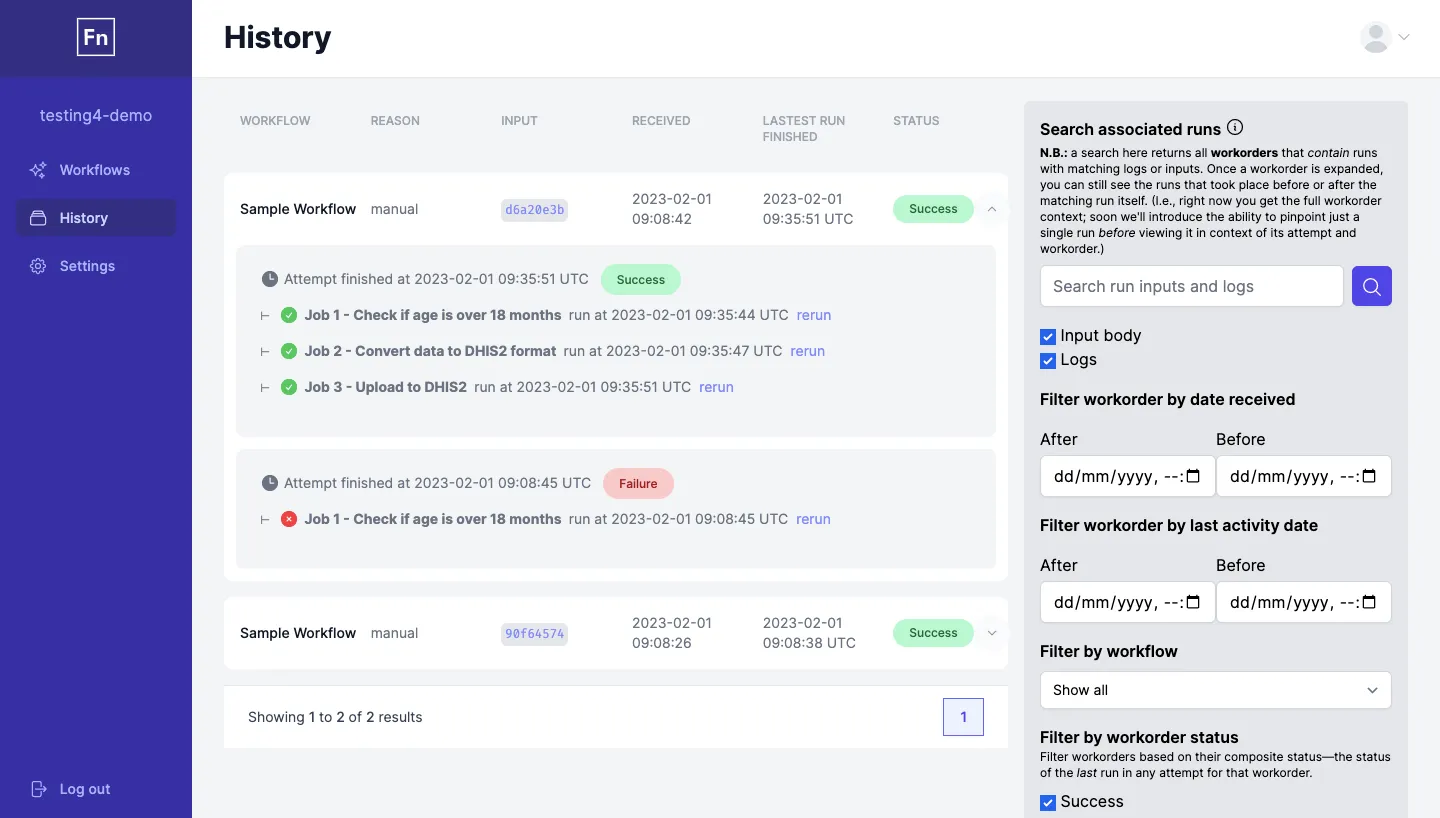
Expand the work order, and click the 'rerun' button next to the first job run.
You'll see a new attempt created in the same work order, which now succeeds. The work order status also gets updated to the status of the last attempt to show 'Success'.
Rerun the same work order, this time from 'Job 3 - Upload to DHIS2'. You'll see the runs for Job 1 and 2 get copied over to the new attempt, so that their output can be used for the input of Job 3.
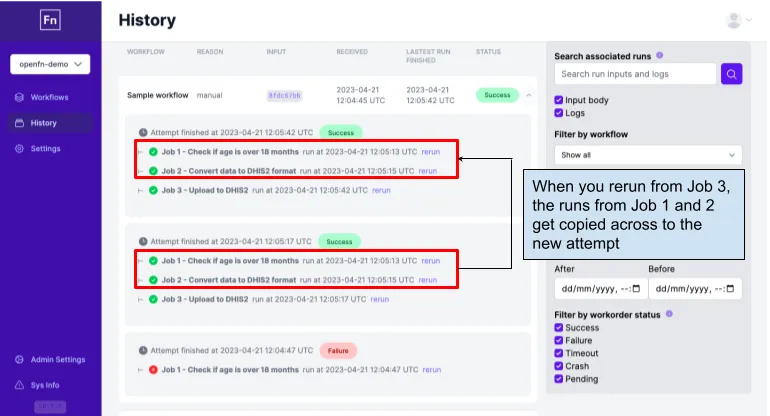
When you rerun a workflow from a downstream job, the previous job runs are copied over to the new attempt, so you can still see where the input from your downstream job came from.
You're all set! If you made it to the end of this tutorial, you should be familiar with the key concepts you need to start building your own workflow. Give it a go, and don't forget to post on our community forum if you get stuck - or to let us know what you built.