GitHub Sync
GitHub Sync enables two-way sync between an OpenFn project and your GitHub repository.
This means changes made to a Project in OpenFn can commit back to your GitHub repo; and commits pushed to GitHub can update the Project in your OpenFn App.
GitHub Sync is only available in projects that are subscribed to Core, Growth, Scale or Custom plans.
Configuring your Project to use GitHub Sync
Users can configure their projects to access one or more repositories on GitHub. Users must have admin access to the GitHub Repo to ensure the OpenFn application is installed.
To configure your project to use Github sync, follow these steps:
-
Navigate to
Project Settings > Sync to GitHub. -
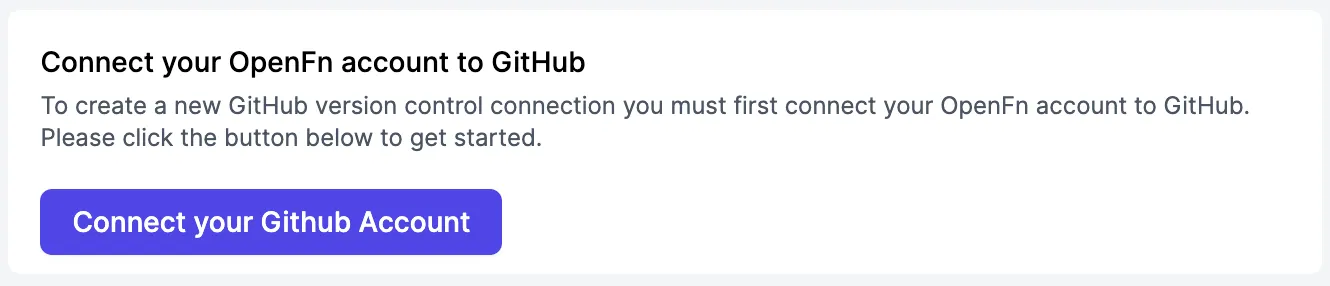
If you have not already connected your OpenFn user account to GitHub, do so by clicking the "Connect your OpenFn account to GitHub" button.
-
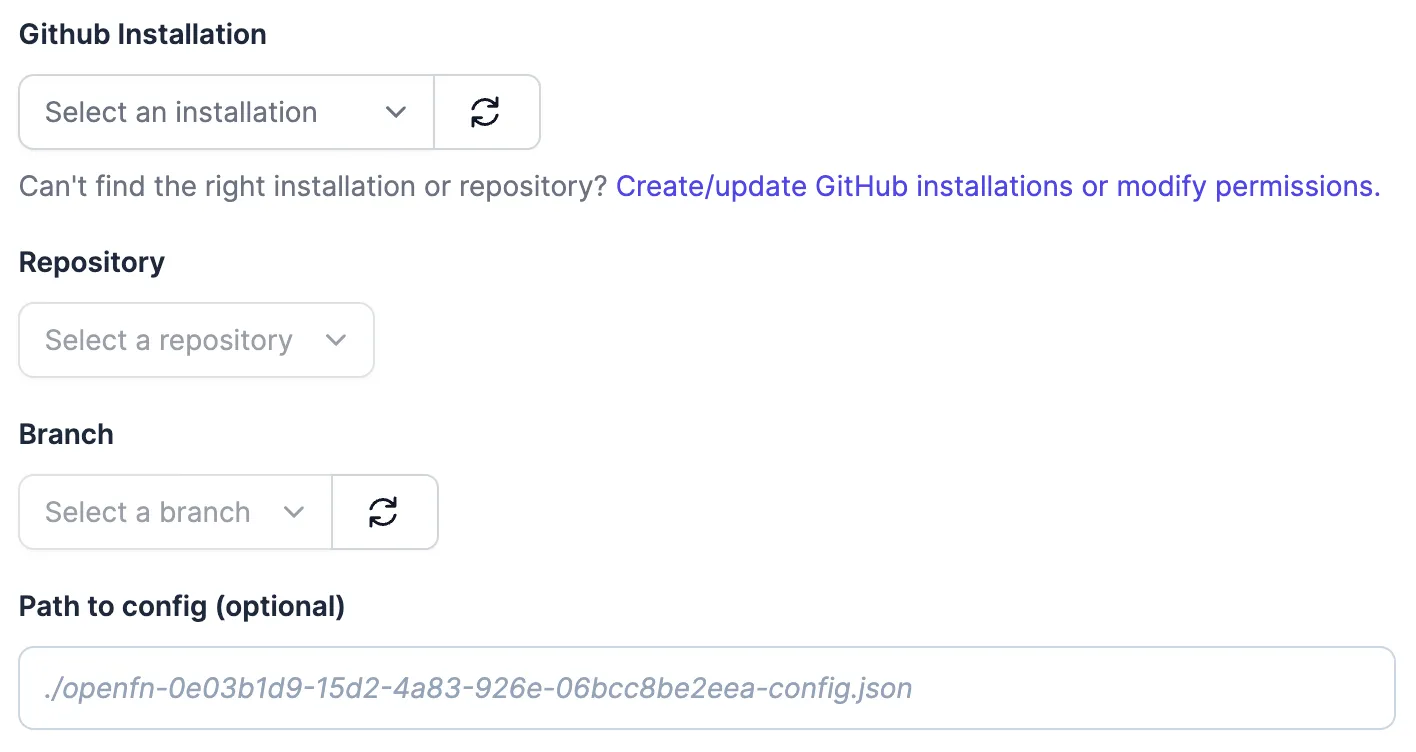
Choose which GitHub installation to use for your project or follow tip below to update your installations.
tipIf you don't see any installations, or those installations don't have access to the repositories you want, click the "Create/update GitHub installations or modify permissions" link to manage the OpenFn Installation on GitHub. This would require you to grant permissions for OpenFn App to access your GitHub account and repository. See Managing Github permissions for help.
When you're done, you can come back here and refresh the lists with the 🔄 button next to the dropdown lists.
-
Choose your preferred repository and branch you'd like to connect your project to
-
Optionally, if you first want to sync from GitHub to OpenFn and already have config file, add a filepath to an existing project
config.jsonfile.Most users leave "Path to config" blank.This advanced feature allows you to connect to a GitHub repo that already has an OpenFn
project.yamlandconfig.json. (Most people can skip this step.) It's useful when you want the first sync to pull data from GitHub into OpenFn. Most users opt to have the first sync come from OpenFn and let the app set up the requiredconfig.jsonandproject.yamlfiles for them. -
Choose the direction of the very first sync action. I.e., when this connection is established, do you want the integration to first send a copy of your OpenFn project to GitHub, or first overwrite your existing OpenFn project with an existing
project.yamlfrom GitHub?Choosing to first deploy from "GitHub to OpenFn" is destructiveBy default, we take what you've got in your current OpenFn project and send it to GitHub to start the version control process. If you choose to instead take an existing
project.yamlfile from GitHub and overwrite your current OpenFn project, you won't be able to recover your existing workflows on OpenFn. This is a feature that covers certain advanced use-cases, and unless you know what you're doing you should start by syncing from "OpenFn to GitHub". -
Click "Connect Branch & Initiate First Sync" to finish. When you've done this, you can head over to GitHub (via the link provided) to view (and start working with) your OpenFn project as code.
Managing GitHub Permissions
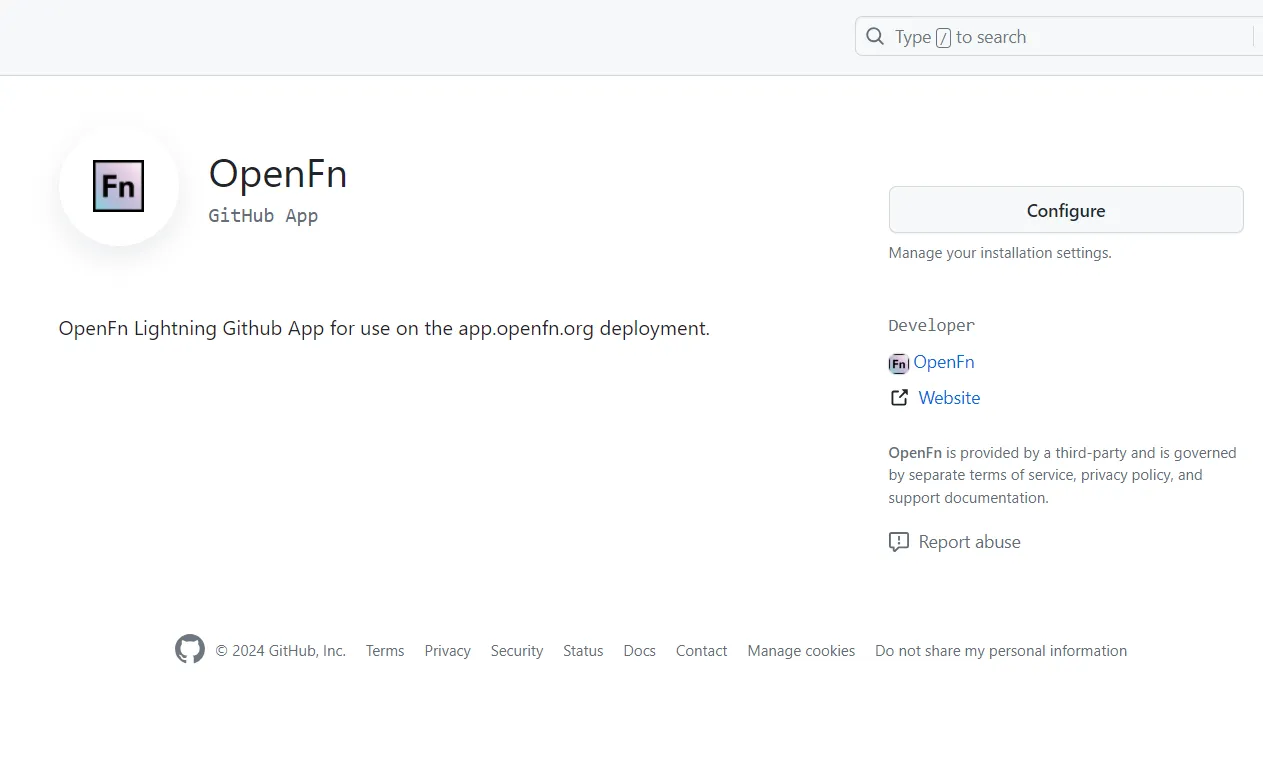
Granting the OpenFn app access to your GitHub repositories happens in GitHub, not in OpenFn. We provide a link to install/manage these permissions via the interface. After clicking that link, you can follow the steps below:
- Click "Configure" or "Install".
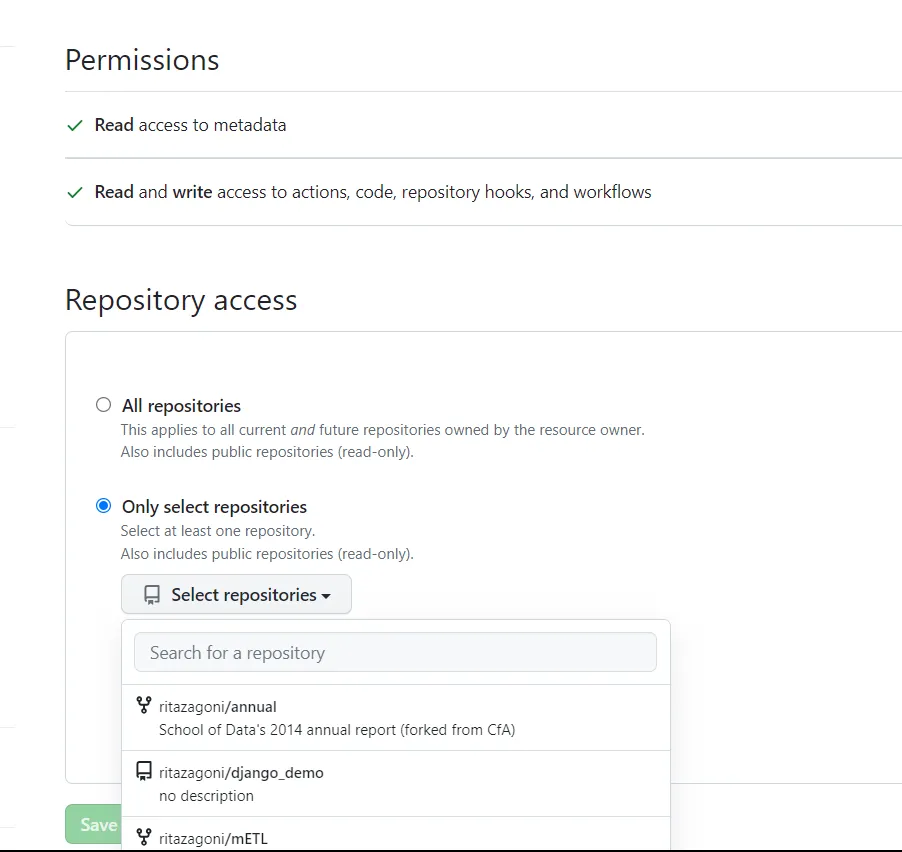
- Then select the GitHub account that owns the repository you want to connect to.

- Select the repository to sync with and hit "Save".
- When you're done making changes on GitHub, head back to OpenFn and refresh the connection lists with the 🔄 button next to the drop down list of available installations.
Using Version Control & Managing Changes
The Sync to GitHub feature makes use of GitHub actions to automatically deploy
(after a commit on GitHub) or pull (when "Initiate Sync to Branch" button is
clicked on OpenFn) project changes to keep a repository in sync with your OpenFn
project.
Sync from OpenFn to GitHub
This sync pushes changes from your OpenFn project to GitHub. This sync operation
will trigger an openfn pull action workflow on your connected Github
repository , which will pull the latest configuration from the OpenFn app and
save it as code in the project.yaml file on your repository.
Your OpenFn project can be represented as code and packaged as project.yaml which is called the project spec. See the portability documentation to learn more.
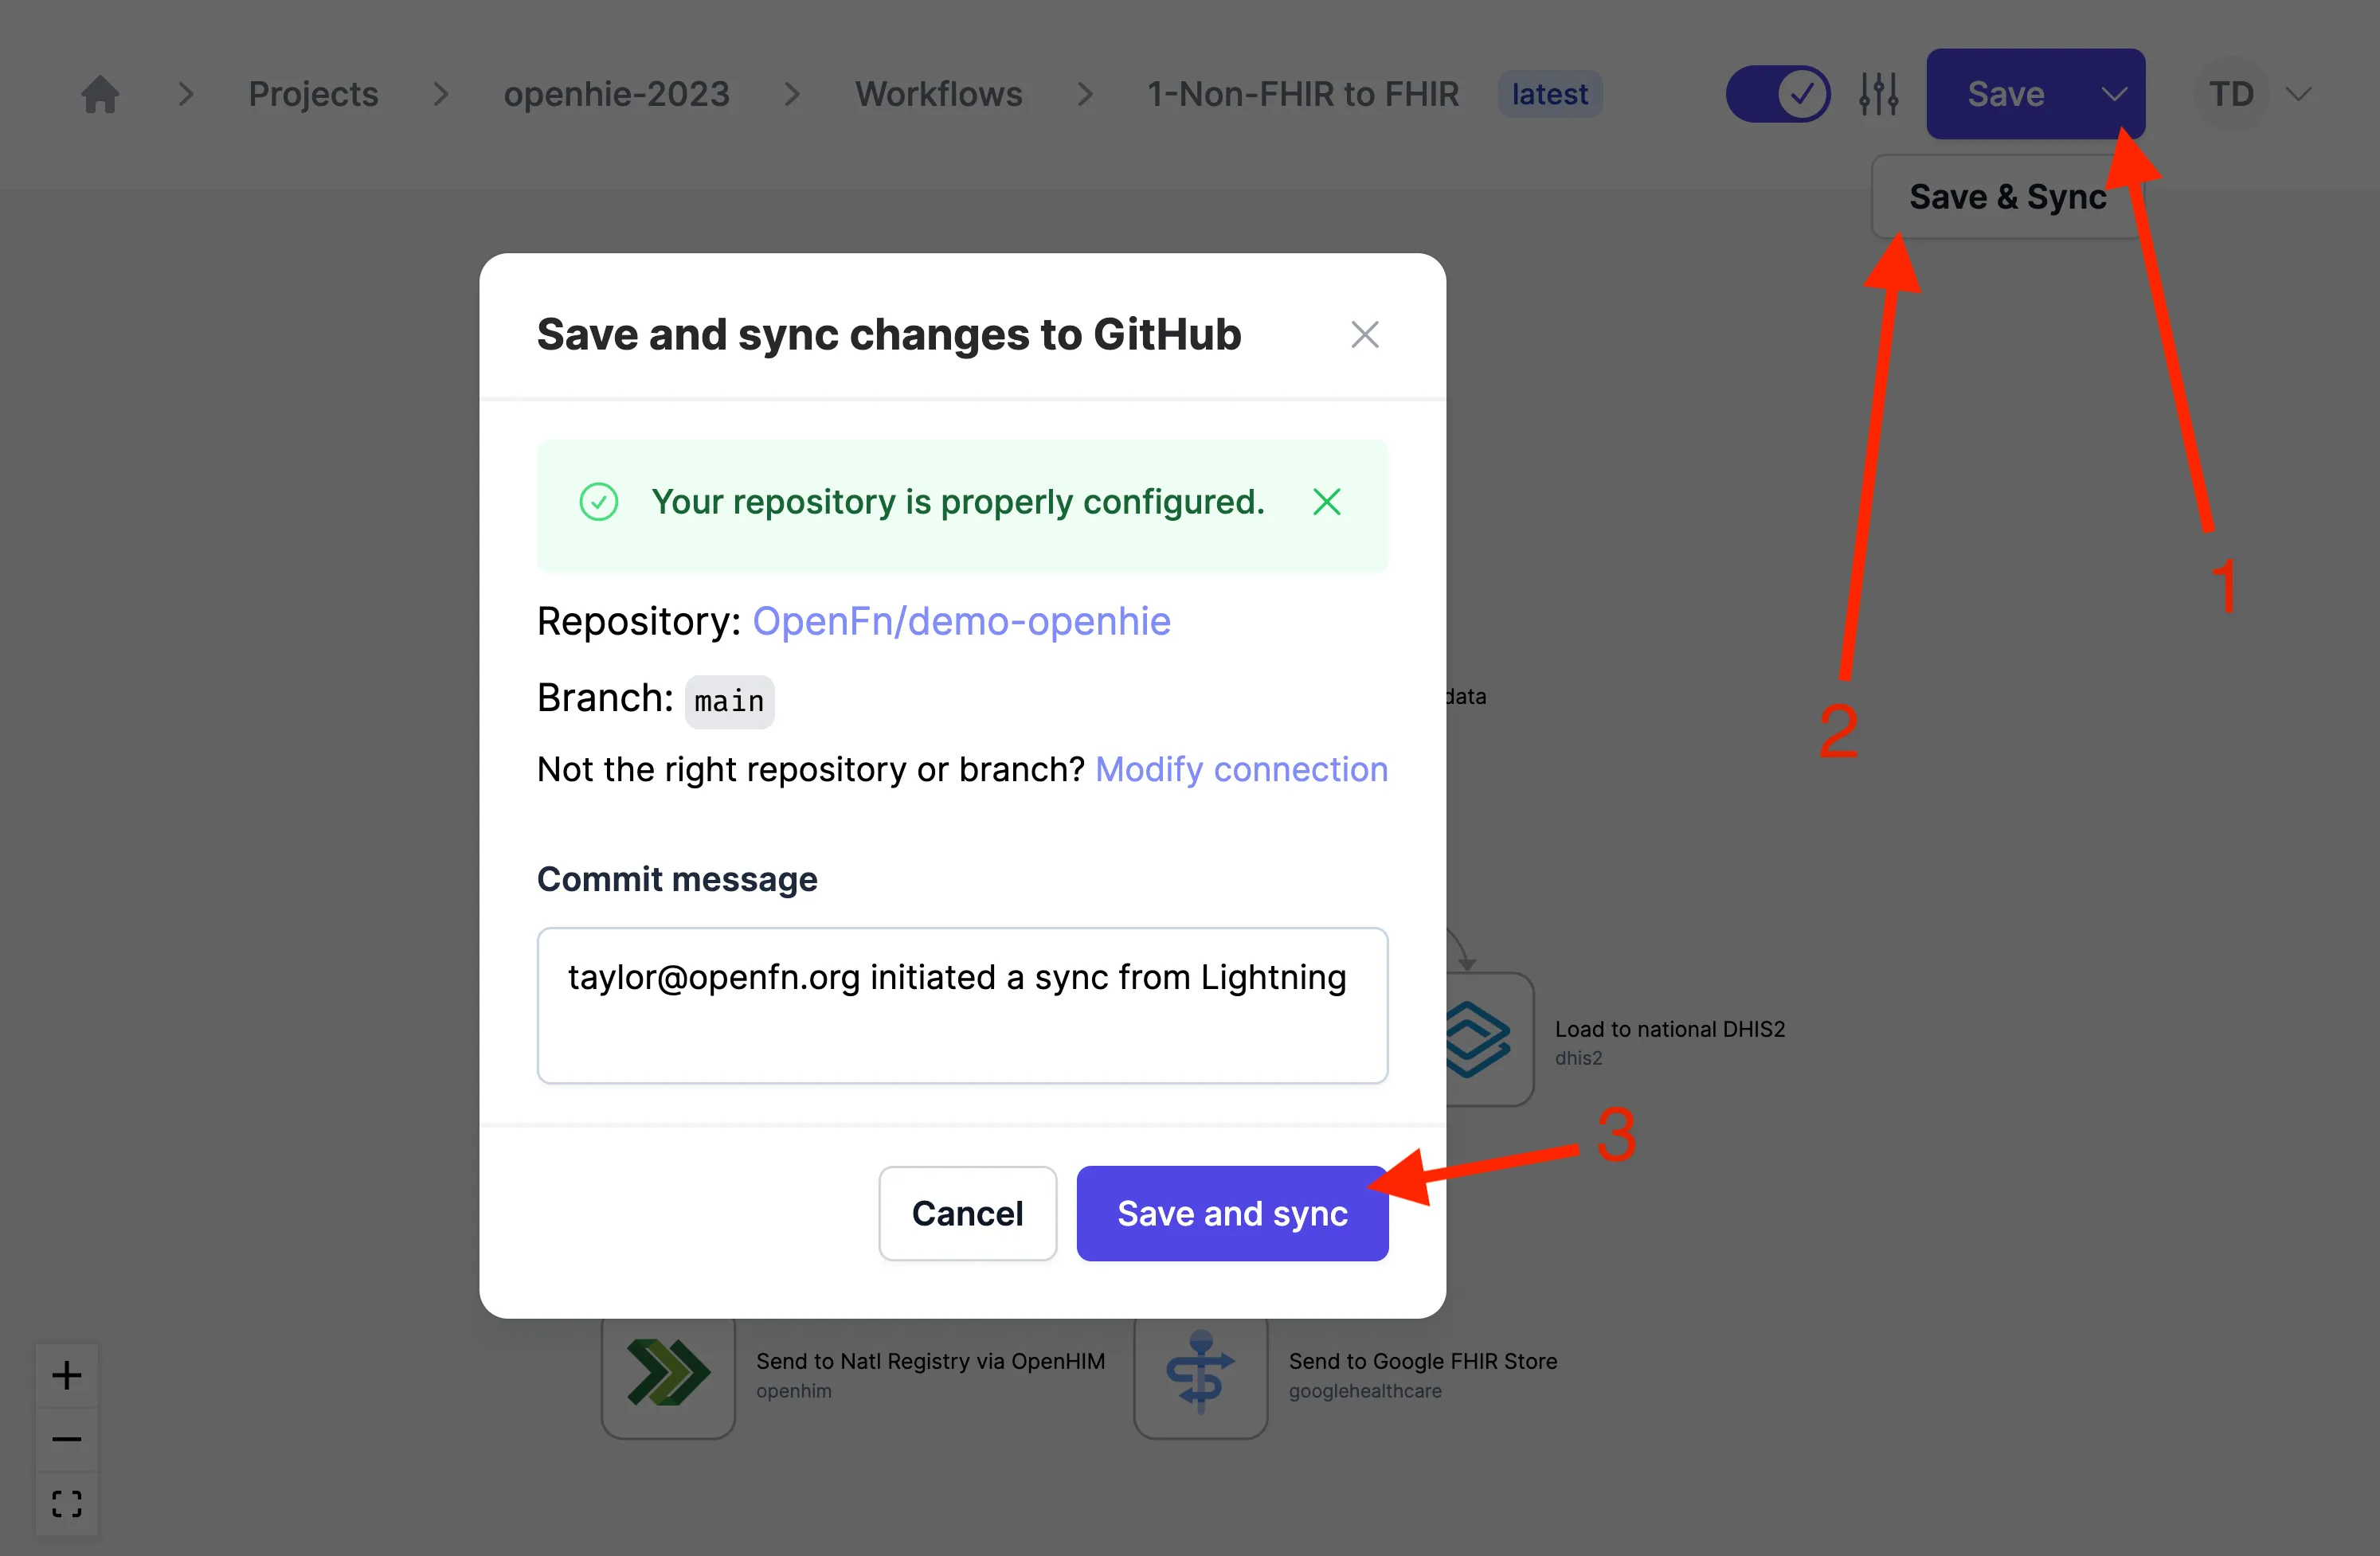
After successfully setting up your project connection to GitHub as detailed above, you can initiate subsequent syncs either via the Canvas, the Inspector or the version control page in the project settings.
To initiate a sync via the Canvas or Inspector, press Ctrl+Shift+s. (Or
⌘+Shift+s on Mac; see
keyboard shortcuts.) You can also click the
dropdown icon beside the save button to select Save & Sync. When you click
Save & Sync, you'll see a confirmation modal with an option for you to customize
the commit message.
When you trigger Save & Sync in a workflow, your new changes and previous
uncommitted changes (if any) to your project's resources (including other
workflows) will be committed to GitHub. I.e., if there are other, uncommitted
changes by either you or someone else to other workflows in the project, they’ll
also show up in that sync.
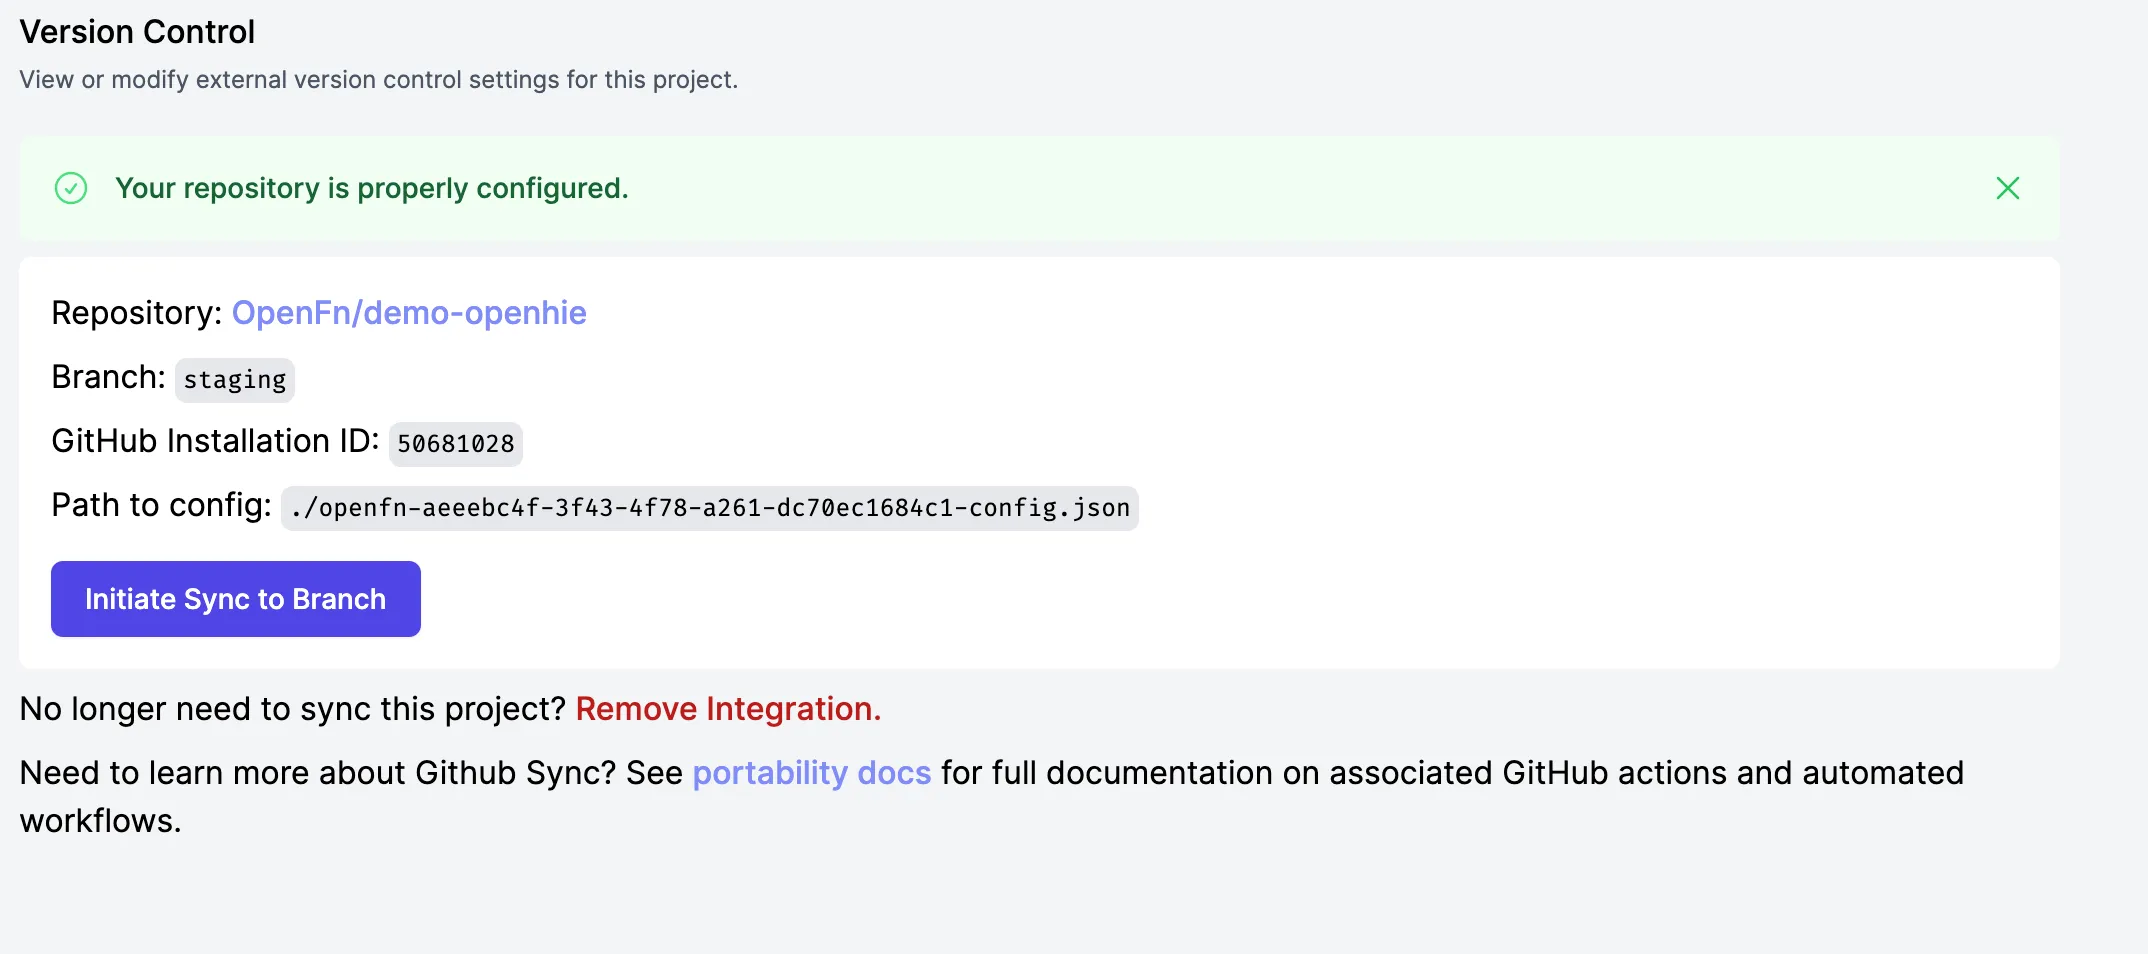
To configure your project to sync to GitHub via the project settings:
- Go to the Project where you made edits to your Workflow(s), and then navigate
to the
Project Settingspage - From the project settings, navigate to the
Version Controlpage by clicking onSync to GitHub - Click the button
Initiate Sync to Branchto trigger a sync to the connected Github repository
Sync from GitHub to OpenFn
Use this sync method when you want to pull a version of your project from GitHub
into OpenFn. When this sync is triggered, openfn-deploy action is executed on
GitHub and your project spec (file ending with .yaml) will be auto-deployed
to OpenFn.
From v2.7.19, OpenFn deploy and pull actions now support the use of relative
paths in project spec. Consequently, projects with directory structure that uses
relative paths for job code in project spec, automatically gets packaged and
deployed without the user having to copy changes into the project spec. This new
approach gives developers more flexibility to better manage their job code in
individual files rather than having all the code in the projectSpec.yaml file.
Learn more about relative paths and directory structure in portability documentation.
Using Sync v2
By default, GitHub Sync will use the legacy folder structure to represent your
project on GitHub. That folder structure is explained below - it'll create
config.json, state.json and project.yaml files to represent your Project
in your git repo.
You can instead choose to use the v2 sync format, as described in the Sync pages. This will automatically "expand" your workflows and steps into files to be easily read and written, and provides a much better developer experience.
This v2 style will be made the default means of syncing Projects soon.
You can also create an empty openfn.yaml file in an already connected repo and
the next sync will generate the v2 file structures.
In Sync v1, you can have multiple 2-way syncs existing on the same branch in a single repo. That's because each project creates its own set of sync artifacts (config.json, project.yaml and state.json). Usually you'd want to do this to sync your production and staging projects, or multiple sandboxes, to the same GitHub repo.
This doesn't work with the new sync protocol, because the new sync shares a
workflows folder. So each time GitHub pulls from your project, it'll overwrite
workflows and wipe out state from your other projects.
To do this in v2 Sync, you can:
- Maintain one two-way sync per branch. Each Sandbox maintains its own GitHub Sync to a different branch in your repo. This works great because you can compare differences between your sandbox and main project by comparing the branches on git.
- Connect many Projects to a branch so long as they only sync one-way. This works in a production environment where one Project is replicated over several deployments, so committing to GitHub will trigger an update to all connected Projects. This works so long as you can promise that no user will Save & Sync back from the production projects
What is in your GitHub Repository?
These docs describe the legacy format of GitHub Sync. The latest format is described in the CLI Sync pages, and will be used by default soon.
When you initiate a connection between OpenFn and your GitHub repository, a config.json file containing reference to your project spec and project state files, and the endpoint of your OpenFn deployment is automatically created in your specified branch. By default, OpenFn will name all your files with your project UUID on OpenFn, so you'll see files that look like this:
{
  "endpoint": "https://app.openfn.org",
  "specPath": "openfn-fdfdf286-aa8e-4c9e-a1d2-89c1e6928a2a-spec.yaml",
  "statePath": "openfn-fdfdf286-aa8e-4c9e-a1d2-89c1e6928a2a-state.json"
}
Users have the flexibility to edit the config.json file to suit their folder structure so long it is pointing to the right project spec, state, and OpenFn endpoint. See example config.json file below with a custom name for the project spec and project state.
{
  "endpoint": "https://app.openfn.org",
  "statePath": "./custom-name-for-project-state.json",
  "specPath": "./custom-name-for-project-spec.yaml"
}
Troubleshooting
Github Sync Error: Unexpected inputs provided: ["snapshots"]
If you installed GitHub sync before July 17th, 2024 you may need to update your
.github/workflows/openfn-pull.yml file to match:
on:
  workflow_dispatch:
    inputs:
      projectId:
        description: 'OpenFN Project ID'
        required: true
      apiSecretName:
        description: 'OpenFN API Key secret name i.e OPENFN_project_API_KEY'
        required: true
      pathToConfig:
        description: 'Path to config.json'
        required: true
      branch:
        description: 'Branch to commit the project state and spec'
        required: true
      commitMessage:
        description: 'Commit message for project state and spec'
        required: true
      snapshots:
        description: 'IDs of snapshots separated by spaces'
        required: false

jobs:
  pull-from-lightning:
    runs-on: ubuntu-latest
    permissions:
      contents: write
    name: A job to pull changes from Lightning
    steps:
      - name: openfn pull and commit
        uses: openfn/cli-pull-action@v1.1.0
        with:
          secret_input: ${{ secrets[inputs.apiSecretName] }}
          project_id_input: ${{ inputs.projectId }}
          config_path_input: ${{ inputs.pathToConfig }}
          branch_input: ${{ inputs.branch }}
          commit_message_input: ${{ inputs.commitMessage }}
          snapshots_input: ${{ inputs.snapshots }}