OAuth Authentication
Some applications require OAuth as an authentication method for connecting with third-party applications and making requests via their APIs. OpenFn allows you to connect with applications using their OAuth authentication. To use this feature in your OpenFn workflows, you need to set up OAuth clients and credentials for your instances or projects. This guide walks you through the management of OAuth clients and credentials.
OAuth Clients
What is an OAuth client and when do I need it?
By setting up OAuth for an application, you authorize OpenFn to connect and interact with this application within a set of scopes defined by you. For example, you might set up an OAuth authorization for OpenFn to connect to your Google Sheets account to read and track changes on your behalf. In this example, you need to set up an OpenFn client that will represent an instance of OpenFn on Google and will hold all the permissions OpenFn needs on your behalf. All API requests and responses are managed through the OpenFn client and authorized by an authorization token stored by the client.
In most cases, one client setup might be sufficient for one application but depending on the project requirements and organization policy, several clients might be set up for one application. These clients might be owned by the same or different OpenFn users and accessible to different projects.
For every application you need to connect to OpenFn, you need to set up at least one client for your project(s).
Oauth clients can be set up either on the project credentials page or the user credentials page.
Creating an OAuth client
If you do not have an OAuth client already set up for your project, you will see an empty section with a button prompting you to create a client as shown below.

Alternatively, you will see the list of existing OAuth clients you have access
to. To create a new client, click the Add new button and select
OAuth client [Advanced] in the dropdown.

Make sure you add https://app.openfn.org/authenticate/callback as the callback
URL for the application when enabling OAuth authentication for the third party
application. (Note: You should substitue https://app.openfn.org/ with your
OpenFn's deployment base URL if you're not using app.openfn.org.)
For app-specific guidance (e.g., how to set up an Oauth Client for Google Sheets), refer to the relevant Adaptor documentation for app-specific guidance
Sharing OAuth Clients
A super user has the privilege to share OAuth clients with projects in two ways:
- Making a client global
- Sharing with specific projects
They can do this in the OAuth client configuration modal either when creating the client, or via editing it.

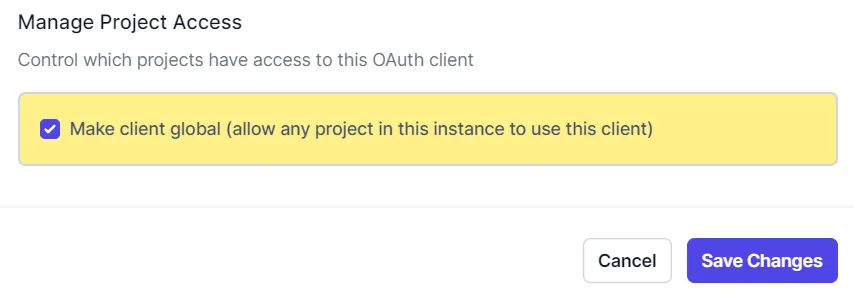
Making OAuth clients global
When an OAuth client is global, users in the instance can have access to it and can create credentials from it.
To make a client global, scroll down to Manage Project Access section in the
OAuth client configuration modal and select the checkbox
Make client global (allow any project in this instance to use this client) and
save changes. All projects on the instance can now access the client and users
with owner, admin and editor rights on these projects can now create credentials
from the client.
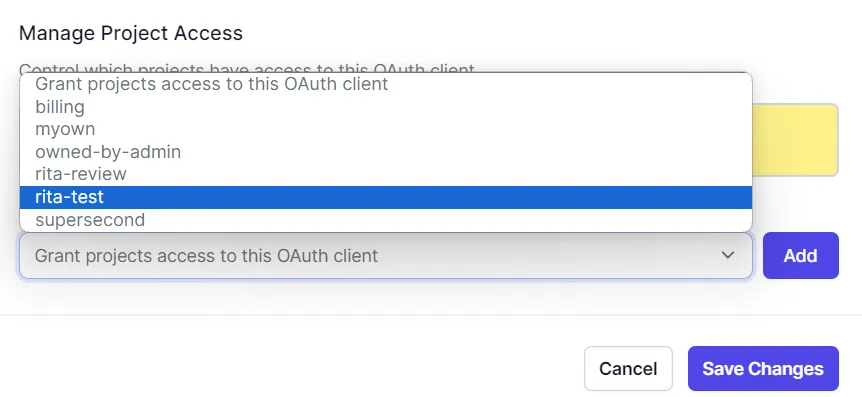
Sharing OAuth clients with projects
To share an OAuth client with specific projects, scroll down to
Manage Project Access section in the OAuth client configuration modal. Select
the project dropdown and select a project and click the add button to grant the
project access to the client.
Oauth Credentials
Creating a credential from an OAuth client
Every client requires an authentication token to authenticate requests made to the application on behalf of the user. On OpenFn, these tokens are created as credentials and are associated with clients.
- To create a credential from an Oauth client, click on "Add new" button and
select
Credentialfrom the dropdown or click on thecreate a new credentialbutton.

- Then, in the credential type modal, find and select the Oauth client to use for creating the OAuth credential. This will open a new modal for you to configure the credential by providing the name, scopes/permissions required and API version.
- When you’ve filled the form, click on the
Sign in with [your OAuth Client name]button to authorize the Oauth client. Clicking this button will open a new tab for you to grant OpenFn an authorization token to authenticate your requests.
When you have signed in, you will be required to grant OpenFn access by clicking
Allow on the permissions modal. Please note that this might look different for
different applications but the intent is to grant OpenFn perimission to carry
out certain actions to the application on your behalf. The user authenticating
OAuth clients should have the required permissions in the application.
Deleting Clients and Credentials
To delete a credential/client, simply click Delete.
A confirmation message pops up to confirm your action.
As soon as you confirm that you want to delete a credential, you will receive an email to notify you that the credential has been scheduled for deletion.
The scheduled deletion date is set by a grace period configured by your instance administrator. On the OpenFn hosted instance, it will be permanently deleted after 7 days.
More on Managing Credentials
Go to the docs on managing user credentials to learn more about credential management for the applications you are integrating with on OpenFn.